To start , I participated in a great, giant troop with the OC Squad (and other Southern California Garrison members) at the OC Zoo in the Irvine Railroad Park. There were about 50 members there between the 501st and Rebel Legion, as well as a few anchor characters like Rey, Vader, and Kylo. It was a lot of fun!


(With celebrity (pig) Kevin Bacon!)
It was a great troop, but it was a bit warm. I'm glad I had some spare white duct tape in case of emergency, because the ANOVOS H&L tape on my shins just couldn't take the heat. After the fact, I had a mess to clean up between the crap H&L tape and the adhesive from the duct tape.

To clean up, I used orange oil, Simple Green, and finally rubbing alcohol to prep the contact areas for some new industrial strength Velcro that I purchased at Home Depot.


After the clean-up, I cut the Velcro to the proper length and width, I carefully placed it onto the shin closures.

I've trooped in it once since then at San Diego Comic Con; we went even though we couldn't get passes for the con itself, because there's a ton to do in the Gaslamp district outside of the con - plus there was a 501st photo shoot Saturday morning for the Imperial Sands Garrison in which I wanted to participate, so it was the perfect excuse to troop! The shins held up very nicely, even when I had to run to the photo shoot at the con when I almost ran late trying to find it.

The serious photo

The fun photo


The really fun photos

My pauldron with a vinyl sticker I had made for the event. I ended up needing to use extra tape as the heat the previous day caused the edges of the vinyl to curl.


The snaps for my thigh garters were slightly bothersome too; if they end up not working after this Velcro replacement, I may try to adjust the snap tension using some pliers, or modify it to be more in-line with a "traditional" belt garter system.
The other casualty was the floppy ANOVOS belt. one of the lower Chicago screws tore through the belt. I'd planned on eventually replacing it with a Rob Kittell belt from www.imperialissue.com, and it seemed like now was the time, especially with the annual squad photo shoot coming up this week and an opportunity to get pictures for my trading cards.
I had previously planned to shim my ab armor to fit around my girth, but after measuring my belly some weeks earlier to plan for this project, I was disappointing with my physical fitness. My wife had started a daily workout and nutrition regimen a couple of weeks earlier, so it was then I decided to join her for workouts in the mornings and to start watching my portion, especially carbs. Within a month I had lost more than a couple of inches form my belly, making shimming he abs completely unnecessary. This was also good because I wanted to get my ab sizing straightened out before ordering the new belt, to ensure I had a belt the correct length.
I ordered his standard 40" belt online and it arrived within a few days - great turn around for flat postage. The belt was as advertised, at 40" with an extra 10" of overlap for the Velcro closure in the back for a total of 50". It has two canvas layers sandwiching a plastic center that gives it a lot more rigidity than the canvas-only ANOVOS belt. This also makes setting up the belt for ANH Stunt easier as the holster is only supposed to be fastened to the belt with two rivets/ Chicago screws instead of the four used by ANOVOS, which would be more inline with the ANH Hero trooper instead.
The first step was to lay the new belt out and mark where all the new holes would go for the snaps (to fasten the belt to the ab plate) and the rivets (to fasten the plastic ammo belt to the new canvas belt). I covered the inside of the belt with blue painters tape so I could mark up the tape - it would be easy to punch through with leather punches and remove before fastening snaps and rivets.

Next it was time to cross the Rubicon and remove the elements from the old ANOVOS belt. Knowing that the rivets fastening the ammo belt to the canvas were terrible to remove, I decided to at least get the ammo belt off the canvas by simply cutting it off the belt, being careful to avoid the elastic of the drop-down ammo boxes. I also had to do this for one Chicago Screw for the holster as it was incredibly torqued and refused to unscrew until I had removed it through cutting and was able to holder the other end with pliers.

Yeah, there was no going back now.
So now was the "fun" part - removing the old rivets from the plastic ammo belt and removing the cover caps from the front. I've read horror stories from the ANOVOS builders FB group and also seen UKSWrath's write-up on his belt. I'd also heard that some people weren't cursed with a crazy amount of pink epoxy and were able to remove the rivets and caps with relative ease.
Unfortunately, dear reader, I wasn't one of those people.
From the onset, I could tell that the caps were glued on with a large amount of pink epoxy (the smell of it reminds me of the stuff used in dentistry to create molds or fasten crowns to teeth). The first thing to do was to remove the rivet on the back of the belt using a Dremel. I used a cutting disk to care a cross into the rivet head so it could be easily remove with pliers and then ground down more.


You can already start to see some deformation in the ABS in the shot above right. Lamentably, in a situation like this, it's not about removing it without damage, but mitigating the amount of damage required to finish the job, to make repair easier.
I hit this epoxy with everything I had, from a butter knife like UKSWrath used, to a heated putty knife, to a cutting disk (this was far too risky and may have caused even more damage), to a sharp knife (I abandoned this for risk of personal safety) and a hobby knife (the blade wasn't long enough and the textured grip was causing too many scratches). I did the best I could, but in the end I had to pry up the last bit of the cap and rip out part of the ammo belt to get them off.


Out of all of this, at least eh caps were removed without breaking, as those are more difficult to repair. I just had to take the Dremel grinding tip to them and clean the epoxy out from inside the caps to ensure they had enough room for whatever mounting hardware I decided to use.

It was a dusty job. Remember to wear a mask folks!
With the caps cleaned out, it was time to start repairing the ammo belt. So I dug into my ABS trimmings and found some pieces to CA glue on to the backside of the ammo belt. I clamped them into place for about 10 minutes to allow the CA glue to cure (I don't currently have any Zip Kicker).

After the glue cured, I went in from the front and filled in the craters with some spare ABS paste from my thigh piece rebuild. That was it for the night, so I decided to let the paste fully cure before resuming work the next evening.

The next evening, I spent an hour sanding down the ABS paste smooth and then polishing, with the help of 100-150-350-600-1500 grit paper (the latter two wet) and Novus 3 and 2. Still some light scratching, but otherwise not bad. The perfectionist in me could spend another hour removing all the light scratches, but I needed to finish tonight to give the E6000 time to cure before Saturday.

I had punched the belt holes (using leather hole punches) and put the snaps on the belt the previous night: I simply used the General Tools Brass Snaps and Fastener I used for the snaps on the ab plate, but the female counterparts on the inside of the belt, again with each snap 17cm from center on each side (34cm total). The new belt fits exactly like the ANOVOS belt, but it's obviously more rigid.
For the ammo belt, I fastened the center using a standard leather rivet with a washer on the back of the snap, to give it more support. I fastened the rivet backwards, with the rivet head on the inside of the belt, as this way was far easier to tap in given the shape of the ammo belt. The bonus is that the rivet head is far less likely to scratch my armor than the rivet back.
For the ends of the ammo belt, I used tow of the four Chicago screws from the hostler, since it was only going to need two of them for the Stunt mounting. I chose Chicago screws for one reason: as a stretch goal, I might alter the costume to support trooping as a Heavy Weapons Trooper (HWT), which don't have drop-down ammo packs on their belts. Using Chicago screws will allow me to unfasten the ends of the ammo belt to easily slip off the drop-downs if that ever happens.
When finished, the assembly was as good as new, on the new belt.


Now it was time for the holster. The first thing to do was remove the two extra holes at the top of the holsters. I measured 2.5" from the top of the holster and cut off the remaining leather, leaving only two mounting holes for the Stunt mounting. I also measured center-to-center on the bottom rivets to get the spacing correct for the belt holes - the measure is 5".


For the belt holes, UKSWrath used different measurements for his holster holes, but I opted to use the ANOVOS belt measurements and fasten the holster slightly higher using a 3/4" measure from the bottom of the belt; this also gives the rivets more purchase on the plastic stock inside the Kittell belt (this should NOT affect being able to apply for Centurion status). Because I had almost exactly 7" between the edge of the ammo belt and the edge of the Velcro, I decided to split the difference and give 1" from either side, which still put me very close to the ammo belt but not too close to the Velcro.

I marked the holes directly on the belt using a pen and very small marks, put the holes into the belt, and mounted the holster. You can't argue with the results - A very clean, strong mounting with all the pieces secure and fit for ANH Stunt CRL.
Edit: when using Chicago screws for the holster, try to use blue thread locker, which you can get form most hardware or auto parts stores. This will keep the screws from becoming loose and falling out, since it's hard to torque them down without deforming the flat threads (which also might cause them to scratch your armor).

Lastly was replacing the rivet caps on the ammo belt, this time using some proper E6000 in case of future maintenance. Before I did that, I CA glued the caps of the Chicago screws onto either end of the ammo belt, to keep them from floating off if I ever need to unscrew them for possible future HWT conversion.

After the CA glue cured, I carefully placed E6000 on the back of the caps and glued them back into place, about 1.25" from either edge to get them as centered as possible, with perhaps 1/4" at most away from the edge of the ammo belt for the caps on the ends.

So I should now be set for this Saturday, and one step closer towards going for EIB and later Centurion certification. For the latter, I still need latex hand guards for the rubber gloves, but I'll source these later as to spread around my purchases. I've already ordered more split rivets to correct the rivet spacing on the left side of the ab armor. Both will be covered sometime in the future on this blog. Until then...

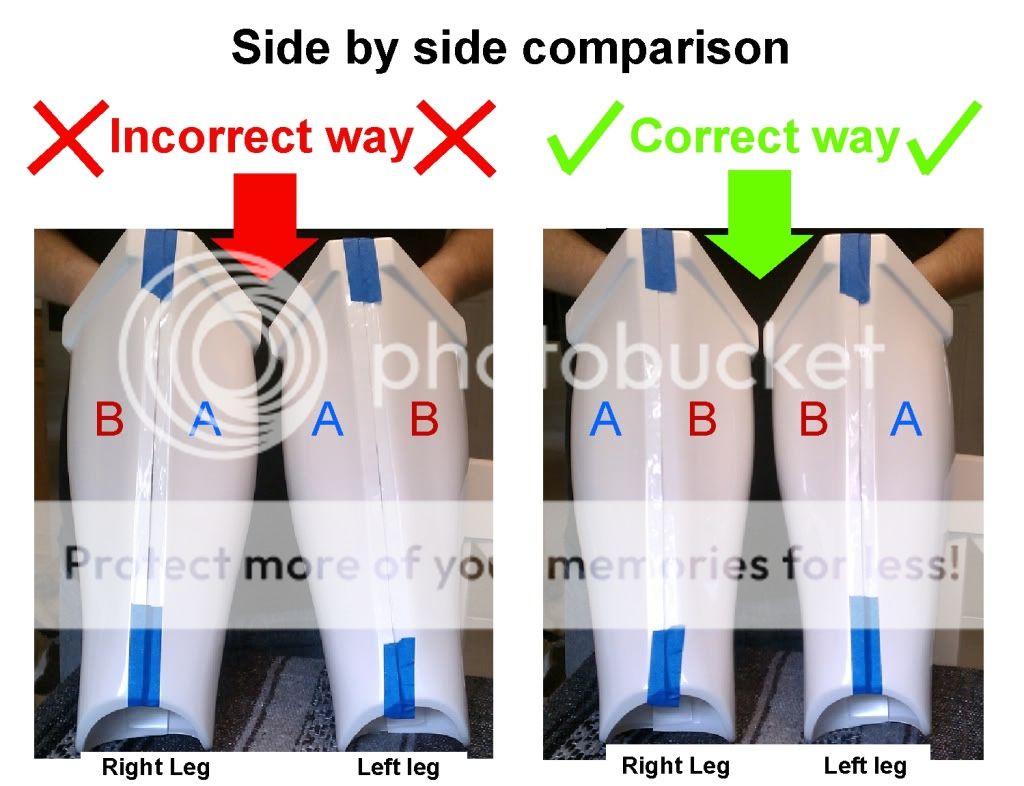 Note (29 March 2019): This issue isn't usually a problem in modern Anovos kits, but if you have an issue with determining the correct pairing of shin pieces, this blog post dated 23 Feb 2016 may be of use. For an updated tutorial, check out


