Featured Post

The TKTalkie v4 - Press 6 for the Imperial March

Upgrading - the Path from v3.15 to v4.0 (Note: I had started this draft last year but never finished it, due to personal issues and cuttin...

Monday, February 29, 2016

Dressing Up on Thigh-day

Didn't get as much done over the weekend as I hoped due to an insect pest problem in the house as well as social gatherings, but I was at least able to finish cementing and clamping the thigh pieces.


Sometimes, when even the magnets don't provide enough clamping action, and the edge that needs clamping is too far towards the middle of the piece, tape is a good alternative. Here it's reinforcing the clamping action of the rare earth magnets int the middle. The large ceramic magnets just didn't have enough magnetic attraction for this job.

While I waited for my thighs to dry, I did a very rough fitting of the torso pieces. They were rough cut with the edges sanded down, but not trimmed.


Everything looks like it will fit, although I might need to slightly shape the kidney plate for better fit if I can't flex it into place. The butt plate might also need some shaping as it's a bit wide. Vertically, it looks like everything is in the right place, which to me was the important part. I was in a rush for a test fit as I was doing this while my youngest son was napping, so I'm hoping to try another taped-on fitting during my next session.  I still haven't received soft parts, though, so I may have to look for some compression clothes and basic black gloves in the meantime (a spare arming suit and non-rubber gloves won't hurt to have around anyhow :P ).


After more than a day in the clamps and magnets, the back of the thighs came out great. Note that I didn't shore up behind the back of the knees as I did with the front. This is because I may be cutting out the back of the knees for comfort and mobility, and until I decide one way or the other, there's no need to wast glue and material.

I've an armor party to attend on Sunday, so I may slow down a bit until I meet with my (hopefully) future squad mates and get more advice. I also have to make a list of things to bring so I forget nothing important at home!

Saturday, February 27, 2016

My Big Thighs

This post will cover a couple of sessions.

The night before last, I glued the front of the thighs together. Ultimately, these shouldn't need to be dismantled, even if shimming is required. Further, because I performed the knee tapering for the thighs pieces all on the back edges, I'll want to the front edges to me solid before forcing those back edges together.

Same steps as before - sand the edges to be glued, apply the glue, make sure the knee edges are lined up, and apply clamps & magnets.


One issue I had was, because the front strips aren't supposed to extend down to the knee, the knee edges wanted to pull apart. So what was I to do? 

First, I taped them on the front side as tight as possible. Then, I took some scraps from the front strips, sanded one side, and glued them onto the inside of the edge. Finally, I applied a spring clamp to hold it in place while the glue set up.


After a day, I un-clamped the pieces, and they looked very nice. I taped them up in the back to ensure fit, and they actually feel better with at least the front edges glued down. The knee butt joints also look wonderful with the strips glued onto the inside of the pieces.


I also cut out the last of my torso pieces so I can start sanding the edges, fitting, and planning  strapping.


Here are all the torso pieces together:


It's weird that I'm finally starting to get to a point where I need to start putting all of these assemblies and sub-assemblies together, like I'm actually going to be finished soon... maybe :P I know there will probably be some trimming to do on some inside edges, as well as fine tuning with the strapping. I do also love to tinker with things well after I'm supposed to be done.

Thursday, February 25, 2016

Stripping Them Thighs

... so hopefully this will be the last time I need to attach the sniper knee to my shins :P Still need some Novos to help clean up the other shin.


Anyhow, it was time to start setting the strips on the thighs. I measured the taped-together pieces one last time to ensure the dimensions were good, or at least close. Using UKSWrath's reference, you can see that the strips don't go all the way down to the knees, so after sanding one side of each strip, I measured using the actual strip and sizing it up to the longer of the two sides. I can trim down later after gluing.


Once the strips were marked for length, I put the center line down the sanded side of the strip to help ensure I didn't glue too much onto the one side of the thigh.


After that, it was just a matter of scoring & snapping the strip, beveling the corners with the Dremel sanding drum, applying the E6000 to the thigh piece, and clamping on the strip. Wash, rinse, and repeat three more times for all four edges.


I originally decided to not join the two thigh sides together at the front in case I needed to trim more, but in hindsight that's a silly notion, since if I were to need to trim, I'd be trimming off the back of the parts anyhow, not the front edge return. Besides, these thighs are pretty snug already, so it's very doubtful that I'd need to trim. But it is what it is, and at least doing it this way will make forcing the two butt joints together a bit easier without worrying about the strip sliding off while trying to get the two ends clamped in tight.

You'll also notice that I inadvertently did the treatment for the outside of the right thigh and the inside of the left thigh. Chalk that up to trying to rush the step before it got too late. Again, I doubt I'll need to trim any more, but I'll know more after the strips set and I can tape them together one last time before gluing. If I have to remove a strip for the purposes of trimming the thigh pieces, worse things have happened :P


These are the only pieces I have yet to trim. I'm getting down to the point where I'll need to start worrying about installing strapping, rivets, and snaps. And I'm still waiting on my arming suit, gloves, and boots (which should be available next week with any luck). With an armor party coming up next Sunday, I'm looking forward to meeting fellow squaddies and TK builders, and getting some advice on final touches for the armor :)

Tuesday, February 23, 2016

Thigh Anxiety

After the issues I had with the shins, I was apprehensive to work on anything else, But I decided that, while I was working to resolve the shin debate, working on other parts would be therapeutic.

Earlier yesterday, on the Anovos FB page I discovered that it was best to set future snaps using the hammer and tap method, as the snaps could be too far in towards the middle of the plate for snap pliers to work, using a snap set tool. I also found that this and more neodymium magnets were at Home Depot, although I hadn't been able to find them before. Undaunted, I want to my local HD during lunch and looked up the parts on my smart phone using HD's mobile site. Surprisingly, when I entered the location I was visiting, the page told the the exact aisle and bin where the products were located. When I found my long-sought-after magnets (to reinforce my existing squad of magnets) I literally laughed in victory. Finally, I had more strong magnets and a tap with which to set snaps in the (hopefully) near future!

The snap tool would come in handy later. Before I start messing with the ab plate though, I was going to work on a set of pieces that wasn't so easy to confuse as the shins...

THIGHS!

Armed with some knowledge from UKSWrath (which I must now take with a grain of salt but to which I still refer) and another post on whitearmor, I got to work taking out more of the inside edges and trimming the back to fit. For the former, I used the Dremel cutting disc and sanding drum since the method works for me (mess and noise aside).


As mentioned in a previous post, my cycling makes my thighs big, so nothing was removed at the top, and 1" to 1.5" was removed near the knees. I used the score & snap method, with clean-up using the Dremel for the small ends near the top that didn't break off cleanly.


After the pieces were cut, I taped them up and fit them on (best to do this wearing an undersuit or without pants, but beware scratches from unfinished edges). The pieces fit well, but I'll probably need to remove more inside edge to reduce rubbing, and perhaps cut the back of the knee out for mobility and comfort.


The fit does concern me, but it's not tapering down the knees that's the issue. Really, it's the top of the thigh that's more concerning, but if I have to shim, I probably would have needed to do it anyhow, considering almost no material was removed from the top. More trimming and fitting will be needed to see if that's necessary.


My night started out a little rough, so that's all I did for this session. Tomorrow I might attempt final trimming and start gluing strips, or work on cutting out the remaining torso pieces. The jury's still out.

Shinale (Resolving a Conflict of Authoritative Advice)

Note (29 March 2019): This issue isn't usually a problem in modern Anovos kits, but if you have an issue with determining the correct pairing of shin pieces, this blog post dated 23 Feb 2016 may be of use. For an updated tutorial, check out UKSWrath's updated guide on shin pre-assembly here.

~~~ ***** ~~~

Because a probable minority of the kits had mis-numbered shin pieces, there has been a ton of talk about the shins, how they go together, and which pieces fit on which leg. I'm hoping that this will be the last post on this subject. If you want to skip to the details and reasoning, skip to the jump.

Yesterday started out like any other day, with some banter and advice regarding the build, and of course the shins come up again. I give my advice, based on what I'd been told by UKSwrath. l However, another poster flatly advised me that my advice was wrong.

This was obviously upsetting, as I have already rebuilt my shins three times. Swapping the legs at this point would mean I have to move the sniper knee and swap the back strips, again.

The crux of the argument ultimately is with a conflict of two authoritative people on whitearmor.net: UKSWrath and his advice on my leg pieces, and TrooperMaster, a 501st FISD Master Armorer, with my own build and with KMan's build.

The conflicting advice, building, and rebuilding of these pieces has caused me a great amount of discontent and stress. Therefore, last night I was resolved to get to the bottom of this issue, through the advice of fellow kit builders and veteran TKs, with other considerations in mind.

I asked two groups for input: the ANOVOS group, and my (hopefully) future 501st squad. Opinions were split down the board. On one hand there's the matter of how it fits me; on the other hand, the armor should be (roughly) anatomically correct for the leg on which it belongs.
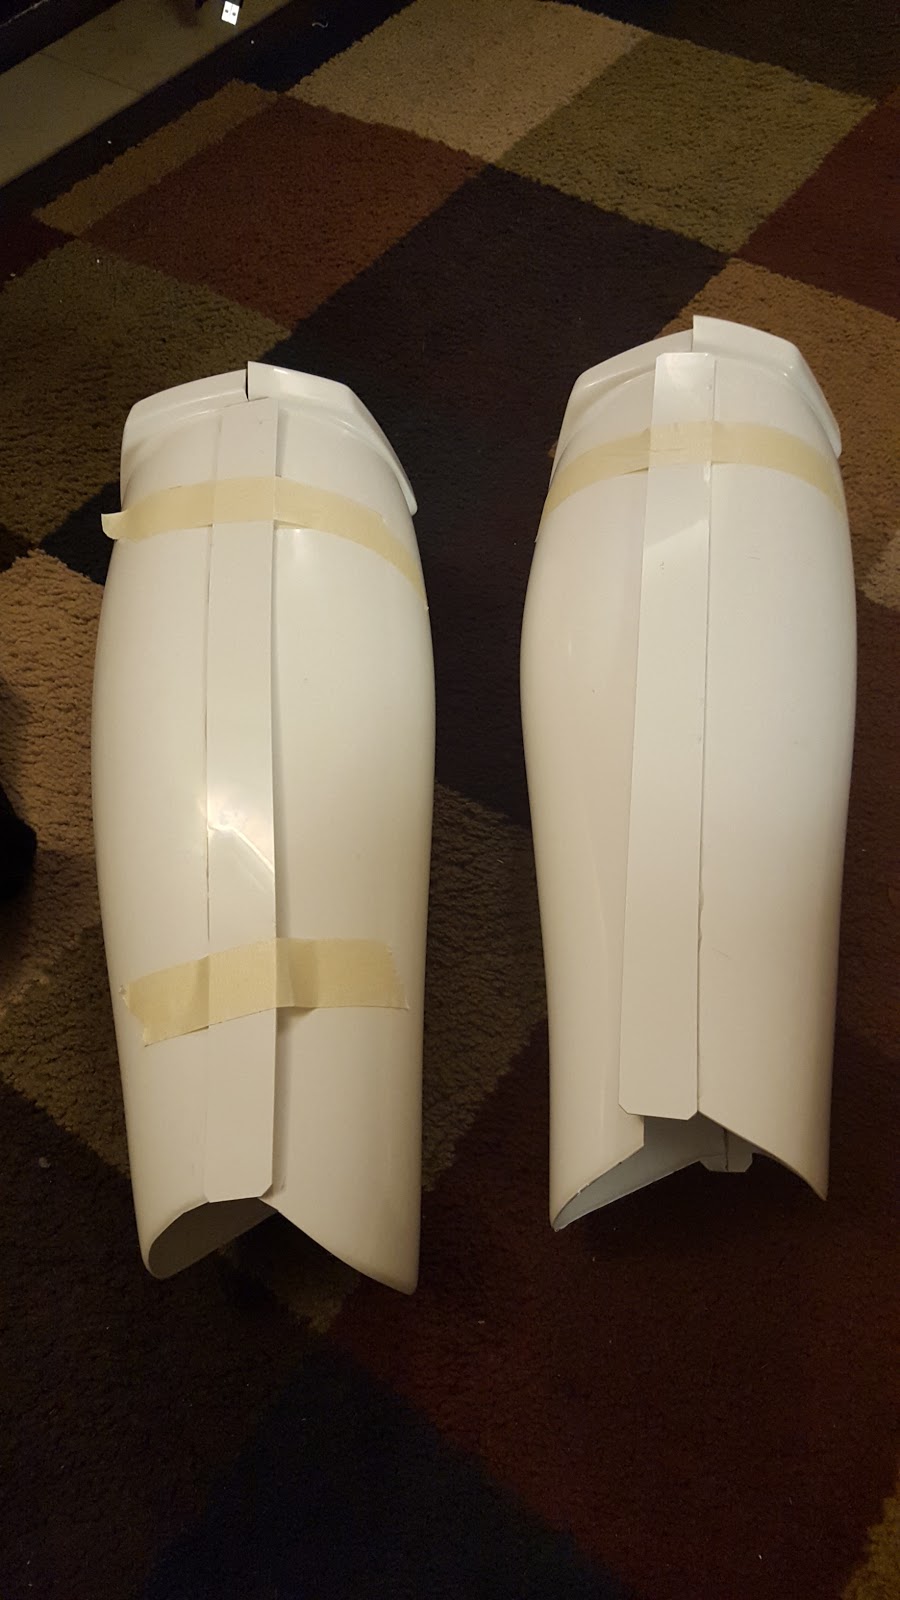
Take this example:


Here's my unsightly right leg, and the shin that should match it (Pieces 25 & 28). On my leg, there's a long curve on the outside of the shin, and a short curve on the inside towards my body's center line. The armor shin matches this.

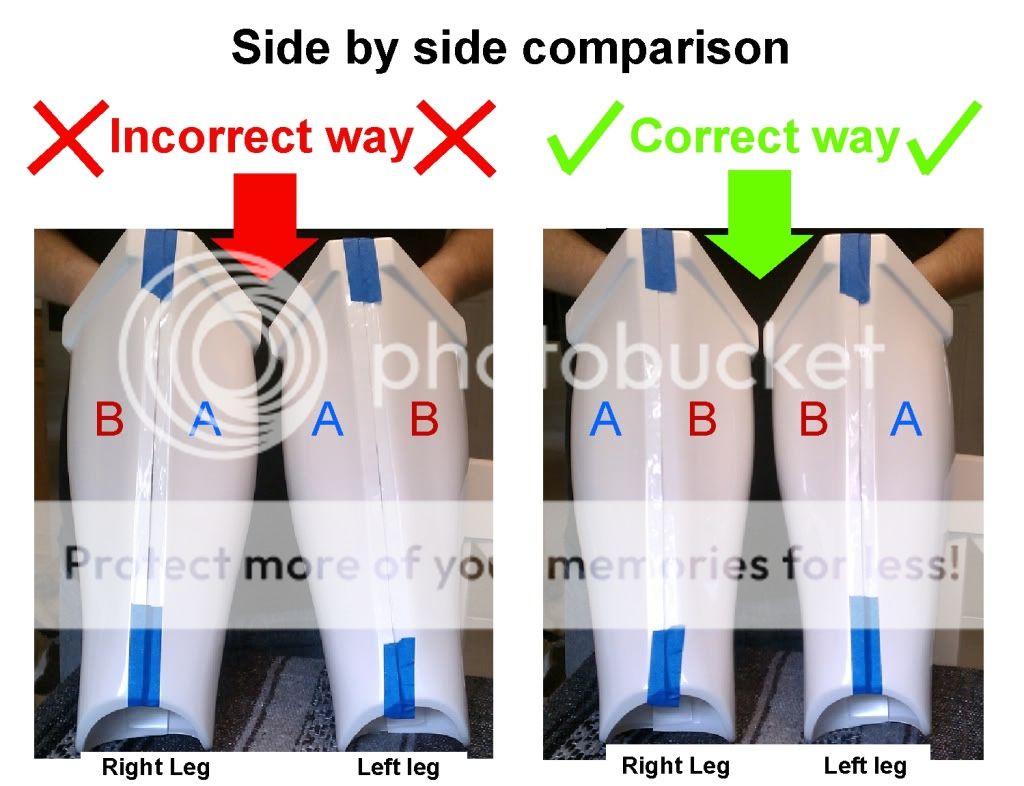
Here's a picture of UKSWrath's right shin, for example. Note how the piece with the broad curve is on the outside of the leg, and the piece with the sharper curve is on the inside:


There's also this graphic from KMan:


After UKSWrath's advice, I wanted to use this shin on my right leg (Pieces 24 & 27):


It fits all right, but the long curve would be on the inside, not the outside like it should be. This should be the shin piece for my left leg... right?

I thought that the shins felt better wearing them on the opposite legs, per UKSWRath's advice. However, I discovered after more test wearing least night and today that it really doesn't matter which leg they're on; they're uncomfortable either way. But why? It's mostly due to the fact that I need to trim off more of the inside edges so that the pieces don't rub the insides of my knees, and the ends of the strips near the ankles. I might also have to make cut-outs for my back of my knees. Those changes should vastly improve comfort.

Using TrooperMaster's advice, the right shin looks weird, but UKSWrath's advice, though, the left shin looks weird. Basically, Pieces 25 & 28 just look weird assembled, and it's just the mold and nothing to do with placement.

So what have I concluded after all of this? Let's recap:

**********

Rough Timeline:
Considerations:
  • TrooperMaster is a master armorer. As snarky as he can be with his advice, it is sound.
  • I originally had my legs laid out in a manner advised by TrooperMaster (until I was told otherwise by UKSWrath).
  • The form of the shins should follow the body's natural form.
  • The shins should be comfortable to troop in.
  • The shins should match screen-worn shins as close as possible.
Final Verdict: (for my case and perhaps others affected by the ANOVOS shin mis-numbering issue):

TrooperMaster's Advice
  • Pieces 24 & 27 should be the left shin
  • Pieces 25 & 28 should be the right shin
Summary:

Please consider that this is my first build, and that by no means am I an authority. I try to give advice based on my personal experiences with this build. However, sometimes the advice given to me by supposed authorities my be inaccurate or just plain wrong. Not only does it irk me to receive wrong advice (well-intended as it should be), but it further pains me to pass along wrong advice to others to whom I give advice or read this blog. If anything, I hope to save someone the trouble of going through the same issues I've encountered.

Also, my apologies to KMan and TrooperMaster for my temper. I was frustrated by the whole ordeal, but after working on thigh pieces last night was able to clear my head and have (hopefully) one last go at this topic.

Anyhow, I'll have to swap the back strips and sniper knee again, as well as perform the trimming on the inside edges of the knees. Afterwards, I can determine if I'll need to cut out the back of the knees for better mobility and comfort while trooping.

I'll be back-updating my older blog posts (again) to eliminate any confusion on this matter, now that I've exhaustively studied it to make a (hopefully) final determination. And don't worry; my next blog should be about something not shin related (thighs, actually).

Sunday, February 21, 2016

Preparing for Thigh Times, and More About "Edge Returns"

I'm training for a century cycling ride in May (that's a 100 mile ride in layman's terms), so after a long ride yesterday (66+ miles), being with the family thereafter, working on dinner, etc., I took the day off of building, besides to take the clamps off the shins. The sniper knee didn't glue right on the right side, so I set more E6000 and reclamped; it should be all right by tomorrow. Speaking of which, tomorrow I plan to but the H&L tape on the shin closures as well as start removing the inside edge returns from the thigh pieces.

Because of my cycling, my thighs measure 16" near the knee and 24" near my groin. The ANOVOS pieces in total measure  near the groin n 25.5" for the right pieces and 26" for the left, so I'll be doing probably no trimming at the top, and only removing an inch or so from each piece near the knee. However, I'll need to remove the inside edges ("edge returns") near the joints before I know what I want to do for sure to ensure a fit that's snug but not too tight. The front edge returns have already been trimmed to fit the front strips, so that's at least already done. Besides, if extra room is needed, it's better to have clean front edges and shim from the back (although I'm hoping this won't be necessary).

Speaking more on edge returns:

This term is sometimes used interchangeably to describe two different things. In the 501st CRLs, the term "edge return" is commonly used to describe the raised edges on the outside of the armor, like the edges near the knees, thighs, and those near the butt joint strips. Others take edge returns to mean the inside edges on the armor that are created when the pieces are molded, that point inward towards the wearer's body (like the inside edges of these forearm pieces in my previous post). For example, the inside edges near the wrist are removed, and according to 501st CRLs, "No return edge on the inside of the front of the forearm is allowed," as having a raised edge at the wrist wouldn't be screen accurate (this might be an issue with low-grade armor sculpts, which is why it's mentioned int he CRLs)..

In the future, to reduce any confusion, I'll be calling the latter "inside edges" as to not confuse readers between those and the raised "edge returns" required at other places on the armor that obviously should NOT be removed, even when trimming a pieces for smaller troopers (at least not fully).

Sorry for the lack of pictures this post, but there really wasn't much to see besides the thigh shells taped together, which I'll snap tonight before taking them apart and using the Dremel to take out those inside edges. Plus my phone's battery was all but dead from my long ride, and it refuses to take pictures on a low battery. So I'll make up for some pictures tomorrow :)

Thursday, February 18, 2016

The Shinning (follow up from The Shell Swap)

Didn't work on the kit tonight as I had to do a Costco run and get ready for a weekend of being shut in due to a major highway closure for construction. But I obviously needed to unclamp my reconstructed shins and try them on with a pair of long socks.

They fit, but just. The closures work a lot better (easier to don and remove) but are a little off near the bottom; I can adjust that using the bra hook method if need be. I taped them up and walked around in them, and they were all right - tricky going up stairs to be sure, at least until I do some trimming, because of the ankle area mostly. I'll also need to remove some of the edge return near the knees to reduce rubbing, These are minor issues compared to what I was previously looking at before swapping parts, and issues I'd most likely have if I'd assembled them correctly in the first place. I'll let you all be the judge.


As mentioned, I'll need to trim the ankles to adjust for the height difference between the two halves, and to keep them from digging into my feet and boots (when TK Boots has my size back in stock later this month). 

To anyone who was affected by this issue and now has ill-fitting shins because of ANOVOs' mistake, I highly recommend you send ANOVOS an email (support@anovos.com) entitled "TK Kit Issue," let them know about their faulty numbering and instructions led to your incorrect build, and demand new parts. I'm fortunate in that I was able to pull mine out of the proverbial fire. I already know others weren't so lucky.

As soon as I get confirmation from the folks on whitearmor, I'll re-attach the sniper knee, start working on sizing the thigh pieces, and finish cutting out the last of my pieces.

Wednesday, February 17, 2016

The Shell Swap (... and This is Why I Use E6000, pt. 2)

I was set on not working on the armor last night. But there was a discussion based upon something that was gnawing at me, and could prove detrimental to my build.

Remember this picture I posted regarding the shins and the huge gap on the right shin closure, and the tight fit on the left shin closure?


A few other people were having the same issue. There was some discussion here and there about the possibility of the pieces being mixed up, not by the builders, but by the numbering Anovos put onto the pieces.

Looking at the back of the pieces as they were, I could tell something was amiss. The ankle profile (as they were taped up to simulate closure) also didn't fill me with confidence that I had the pieces assembled correctly.

This can't be right, can it? I know the kit is "screen accurate," but...

Having used E6000, and despite the pain it would be to test the theory, I did the only sensible thing I could think of, and pull the pieces apart, almost down to the strips. And then I started assembling them by swapping pieces.

After several iterations of test clamping, observation, and getting over denial, I came to the conclusion that the pieces were mislabeled by Anovos, and I had cut and assembled them incorrectly.

Here is the correct order of the pieces for my particular kit:


In this configuration, the pieces closed better in the back, the shins were both much more symmetric (as far as symmetry goes with this kit), and the curves lined up better in regards to the inner pieces curving for the calves inward more (approaching the ankles from the top) than the outer pieces.


Thankfully, I had cut the pieces rather symmetrically in that each piece was 8" near the knee and 6" near the ankle, making swapping them less painful. However, some of the pieces were still sanded in order to make adhesion better for the cement (for strips and the sniper knee), so I will need to get (sooner rather than later) some Novus 1-2-3 to remove those sanded areas.

So I removed some strips, cleaned up the old adhesive best as possible, paired the pieces together as they should be, re-cemented, and re-clamped/ placed magnets.


The back of one shin will have some extra scuff as that edge was sanded for the back edge strip that had to be moved to the correct piece. However, it will be covered up by the cover strip on the closure, probably using the H&L tape for the time being.

All in all, I think this will be complete salvageable. My problem probably isn't reflective of all kits, but if things are looking weird with your shins, consider that the labeling from Anovos may be incorrect. I'm not sure if it's related, but my kit was also missing the artwork (which is now being shipped separately from Anovos).

EDIT: there's no correlation between mis-numbered pieces and missing artwork. At least one kit I've heard of had the artwork AND mis-numbered pieces.

Edit: for the results of the swap, see my next blog post here.

Tuesday, February 16, 2016

Sexy Knee and Shapely Thighs

This post is going to be "photo lite" as not a ton happened the session.

I unclamped the shins and found them to be good, although I'm worried about the right shin not settling into a closing position - I don't think the H&L will be able to pull it together. I'm going to ask around to see what can be done about it, weather I need to apply heat, use a different kind of closure, etc.

EDIT: read this post before working on your shins. A small number of kits were affected by mis-numbering of parts.

Until then, I installed the sniper knee on my left shin piece. I went by UKSrath's playbook on this one. although I had to trim off a small part of the overhang on the "stage left" side of the knee pad so that it wouldn't go over the bend on the knee. After quadruple-checking placement and penciling the contact points on the shin pieces, I sanded the contact points on shin and pad, cemented, and clamped.

I also trimmed the front edges off the thighs. After reading so many horror stories, I expected the thighs to be tough. After reading UKSWrath's write-up, though, they just seem to be just like the shins or forearms, just bigger.


The easiest way to trim the excess off the front, for me, is to use a strip to see where you want the edge to fall. Then, make three tiny marks for top, center, and bottom on those edges. With these in place, you can measure 10mm towards the edge of the piece (using clamps to help), line up the straight edge, draw the cutting line, and then cut using the score method or Dremel (moving clamps along the line to complete the cut as needed).

With the four front edges cut, I'll now have to worry about fitting and cutting. Fortunately, I've already measured my thighs and have a good idea as to how big these pieces will need to be for a snug yet comfortable fit. However, I may take a break tomorrow so I can catch up on chores, sleep, and hanging out with my dear wife.When it comes time to start fitting torso pieces, I'll probably need her expert Theater and costuming help to help my line them up for proper strap fitting :)

Monday, February 15, 2016

Shin-anigans

Starting with the helmet again, this time it seems that the adhesive worked. I picked off the excess and got the mount back into my helmet. I removed the white interior straps and re-positioned them so that the side straps were slightly diagonal going towards rear as they got deeper into the mask, ant the top strap was re-positioned slightly towards rear. With this configuration I had enough room to easily see through the eye with my glasses on.


The one thing that's apparent is that I'll probably need to cave and buy a small fan for the mask as it gets steamy, even with the slots in the frown. But I have a Fry's near my office and an Amazon Prime account, so I'll worry about that later.

EDIT: read this post before working on your shins. A small number of kits were affected by mis-numbering of parts.

Moving back to the shins, I un-clamped the pieces and commenced to cement the outer shells to the front strip. Since the back of these shells will be fastened with H&L tape, this will be untouched for now, and certainly NOT cemented.


I have yet to address the thighs. I'll be doing some reading on uskwrath's thread to see the best method for sizing, trimming, and cementing before I tackle these. Plus, I would be able to clamp anything tonight with the shins setting up, so I instead trimmed out the sniper knee plate (#23) for the left shin and the small ammo belt (#26) for the right thigh.


I also decided to finally start trimming torso pieces, starting with the chest (#2) and back plate (#5). I had some very minor blade slip on some of the curves, but nothing that can't be polished out. Since I wanted to start piecing the upper torso together,  I'll need these pieces and the shoulder straps to start.


Scraped some skin on my thumb using the score & snap method while I was snapping. Thankfully, CA glue instantly bonds to skin and makes a great makeshift band-aid to keep me from bleeding on the armor.

Going to try tackling the thigh pieces tomorrow as I finish up the shins and start working on strapping the upper torso. Going to need to order rivet pliers from Amazon for parts on the lower torso that require snaps, and perhaps for trying future harnessing methods (of course, I'll be suing the Anovos straps initially).

More fun next session :)