Featured Post

The TKTalkie v4 - Press 6 for the Imperial March

Upgrading - the Path from v3.15 to v4.0 (Note: I had started this draft last year but never finished it, due to personal issues and cuttin...

Showing posts with label inside edges. Show all posts

Monday, March 28, 2016

Testing the Torso and Truncating my Trunk

I finished strapping up the torso by adding the chest and back plates. I don't have any pictures of the straps, but it's basically straight out of the ANOVOS instructions for these sections - four of the longer H&L straps, two per piece, to connect the chest to the ab plate and the back to the kidney plate. Then, connected at the top with the T-shaped shoulder straps. The final look, once donned, is impressive :)


One thing I noticed is that the ab and kidney plate likes to separate near the bottom, due to the slight gut I have. I guess I'll need to work out and wear a girdle in the mean time. It's the only place on my body that's overly fatty.


Additionally, the modified ANOVOS belt seems to be working well enough. The only thing left to do with it is to remove or cover up the upper two Chicago screws to qualify for Stunt Basic or EIB certification for the 501st. I plan to do this with small circular pieces of iron-on canvas patch, after I try adding some washers to the screws to reduce the chances of the holster tearing through the belt.

After the fitting, I finished trimming and gluing the painted ab buttons in place.


There were some places on the armor that had obvious rub, like the back plate into my shoulders and the posterior plate into my inner legs. So I sanded these down with the Dremel sanding drum to eliminate and taper inner edges.


I also noticed, as I did on my friend's armor during the armor party, that the posterior plate likes to stick out. To combat this, I added to two tabs on the inside of the piece, on the edge returns, so that the plate would hook behind the kidney plate when strapped into place.


I'd honestly be about done at this point, but after fitting the thighs some more, it occurred to me that, although I have the thighs properly trimmed for length, I don't have them trimmed for shape. However, more importantly, they don't come up as far as I need them to (when I'm standing). They're too tight, especially near the top where almost no material was trimmed (save the front edge returns). Therefore, I'll have to accept the fact that I need to shim them. I've already started this process, but will make another blog post dedicated entirely to the process. Until then...

Tuesday, February 23, 2016

Thigh Anxiety

After the issues I had with the shins, I was apprehensive to work on anything else, But I decided that, while I was working to resolve the shin debate, working on other parts would be therapeutic.

Earlier yesterday, on the Anovos FB page I discovered that it was best to set future snaps using the hammer and tap method, as the snaps could be too far in towards the middle of the plate for snap pliers to work, using a snap set tool. I also found that this and more neodymium magnets were at Home Depot, although I hadn't been able to find them before. Undaunted, I want to my local HD during lunch and looked up the parts on my smart phone using HD's mobile site. Surprisingly, when I entered the location I was visiting, the page told the the exact aisle and bin where the products were located. When I found my long-sought-after magnets (to reinforce my existing squad of magnets) I literally laughed in victory. Finally, I had more strong magnets and a tap with which to set snaps in the (hopefully) near future!

The snap tool would come in handy later. Before I start messing with the ab plate though, I was going to work on a set of pieces that wasn't so easy to confuse as the shins...

THIGHS!

Armed with some knowledge from UKSWrath (which I must now take with a grain of salt but to which I still refer) and another post on whitearmor, I got to work taking out more of the inside edges and trimming the back to fit. For the former, I used the Dremel cutting disc and sanding drum since the method works for me (mess and noise aside).


As mentioned in a previous post, my cycling makes my thighs big, so nothing was removed at the top, and 1" to 1.5" was removed near the knees. I used the score & snap method, with clean-up using the Dremel for the small ends near the top that didn't break off cleanly.


After the pieces were cut, I taped them up and fit them on (best to do this wearing an undersuit or without pants, but beware scratches from unfinished edges). The pieces fit well, but I'll probably need to remove more inside edge to reduce rubbing, and perhaps cut the back of the knee out for mobility and comfort.


The fit does concern me, but it's not tapering down the knees that's the issue. Really, it's the top of the thigh that's more concerning, but if I have to shim, I probably would have needed to do it anyhow, considering almost no material was removed from the top. More trimming and fitting will be needed to see if that's necessary.


My night started out a little rough, so that's all I did for this session. Tomorrow I might attempt final trimming and start gluing strips, or work on cutting out the remaining torso pieces. The jury's still out.

Shinale (Resolving a Conflict of Authoritative Advice)

Note (29 March 2019): This issue isn't usually a problem in modern Anovos kits, but if you have an issue with determining the correct pairing of shin pieces, this blog post dated 23 Feb 2016 may be of use. For an updated tutorial, check out UKSWrath's updated guide on shin pre-assembly here.

~~~ ***** ~~~

Because a probable minority of the kits had mis-numbered shin pieces, there has been a ton of talk about the shins, how they go together, and which pieces fit on which leg. I'm hoping that this will be the last post on this subject. If you want to skip to the details and reasoning, skip to the jump.

Yesterday started out like any other day, with some banter and advice regarding the build, and of course the shins come up again. I give my advice, based on what I'd been told by UKSwrath. l However, another poster flatly advised me that my advice was wrong.

This was obviously upsetting, as I have already rebuilt my shins three times. Swapping the legs at this point would mean I have to move the sniper knee and swap the back strips, again.

The crux of the argument ultimately is with a conflict of two authoritative people on whitearmor.net: UKSWrath and his advice on my leg pieces, and TrooperMaster, a 501st FISD Master Armorer, with my own build and with KMan's build.

The conflicting advice, building, and rebuilding of these pieces has caused me a great amount of discontent and stress. Therefore, last night I was resolved to get to the bottom of this issue, through the advice of fellow kit builders and veteran TKs, with other considerations in mind.

I asked two groups for input: the ANOVOS group, and my (hopefully) future 501st squad. Opinions were split down the board. On one hand there's the matter of how it fits me; on the other hand, the armor should be (roughly) anatomically correct for the leg on which it belongs.

Take this example:


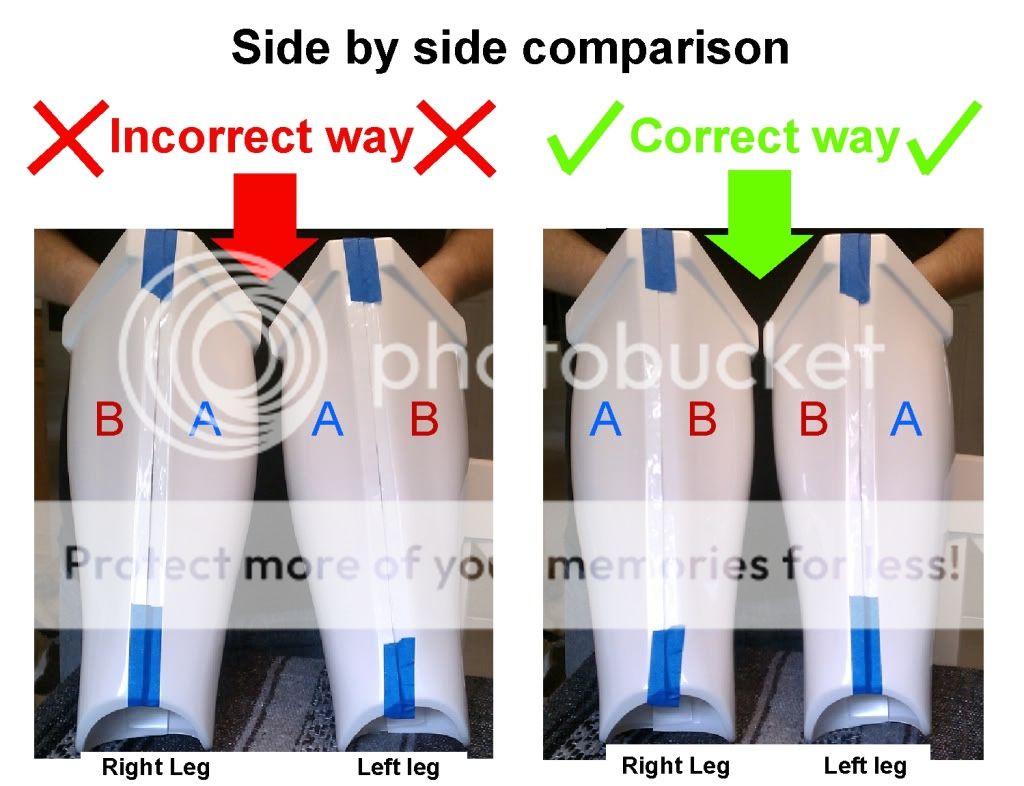
Here's my unsightly right leg, and the shin that should match it (Pieces 25 & 28). On my leg, there's a long curve on the outside of the shin, and a short curve on the inside towards my body's center line. The armor shin matches this.

Here's a picture of UKSWrath's right shin, for example. Note how the piece with the broad curve is on the outside of the leg, and the piece with the sharper curve is on the inside:


There's also this graphic from KMan:


After UKSWrath's advice, I wanted to use this shin on my right leg (Pieces 24 & 27):


It fits all right, but the long curve would be on the inside, not the outside like it should be. This should be the shin piece for my left leg... right?

I thought that the shins felt better wearing them on the opposite legs, per UKSWRath's advice. However, I discovered after more test wearing least night and today that it really doesn't matter which leg they're on; they're uncomfortable either way. But why? It's mostly due to the fact that I need to trim off more of the inside edges so that the pieces don't rub the insides of my knees, and the ends of the strips near the ankles. I might also have to make cut-outs for my back of my knees. Those changes should vastly improve comfort.

Using TrooperMaster's advice, the right shin looks weird, but UKSWrath's advice, though, the left shin looks weird. Basically, Pieces 25 & 28 just look weird assembled, and it's just the mold and nothing to do with placement.

So what have I concluded after all of this? Let's recap:

**********

Rough Timeline:
Considerations:
  • TrooperMaster is a master armorer. As snarky as he can be with his advice, it is sound.
  • I originally had my legs laid out in a manner advised by TrooperMaster (until I was told otherwise by UKSWrath).
  • The form of the shins should follow the body's natural form.
  • The shins should be comfortable to troop in.
  • The shins should match screen-worn shins as close as possible.
Final Verdict: (for my case and perhaps others affected by the ANOVOS shin mis-numbering issue):

TrooperMaster's Advice
  • Pieces 24 & 27 should be the left shin
  • Pieces 25 & 28 should be the right shin
Summary:

Please consider that this is my first build, and that by no means am I an authority. I try to give advice based on my personal experiences with this build. However, sometimes the advice given to me by supposed authorities my be inaccurate or just plain wrong. Not only does it irk me to receive wrong advice (well-intended as it should be), but it further pains me to pass along wrong advice to others to whom I give advice or read this blog. If anything, I hope to save someone the trouble of going through the same issues I've encountered.

Also, my apologies to KMan and TrooperMaster for my temper. I was frustrated by the whole ordeal, but after working on thigh pieces last night was able to clear my head and have (hopefully) one last go at this topic.

Anyhow, I'll have to swap the back strips and sniper knee again, as well as perform the trimming on the inside edges of the knees. Afterwards, I can determine if I'll need to cut out the back of the knees for better mobility and comfort while trooping.

I'll be back-updating my older blog posts (again) to eliminate any confusion on this matter, now that I've exhaustively studied it to make a (hopefully) final determination. And don't worry; my next blog should be about something not shin related (thighs, actually).

Sunday, February 21, 2016

Preparing for Thigh Times, and More About "Edge Returns"

I'm training for a century cycling ride in May (that's a 100 mile ride in layman's terms), so after a long ride yesterday (66+ miles), being with the family thereafter, working on dinner, etc., I took the day off of building, besides to take the clamps off the shins. The sniper knee didn't glue right on the right side, so I set more E6000 and reclamped; it should be all right by tomorrow. Speaking of which, tomorrow I plan to but the H&L tape on the shin closures as well as start removing the inside edge returns from the thigh pieces.

Because of my cycling, my thighs measure 16" near the knee and 24" near my groin. The ANOVOS pieces in total measure  near the groin n 25.5" for the right pieces and 26" for the left, so I'll be doing probably no trimming at the top, and only removing an inch or so from each piece near the knee. However, I'll need to remove the inside edges ("edge returns") near the joints before I know what I want to do for sure to ensure a fit that's snug but not too tight. The front edge returns have already been trimmed to fit the front strips, so that's at least already done. Besides, if extra room is needed, it's better to have clean front edges and shim from the back (although I'm hoping this won't be necessary).

Speaking more on edge returns:

This term is sometimes used interchangeably to describe two different things. In the 501st CRLs, the term "edge return" is commonly used to describe the raised edges on the outside of the armor, like the edges near the knees, thighs, and those near the butt joint strips. Others take edge returns to mean the inside edges on the armor that are created when the pieces are molded, that point inward towards the wearer's body (like the inside edges of these forearm pieces in my previous post). For example, the inside edges near the wrist are removed, and according to 501st CRLs, "No return edge on the inside of the front of the forearm is allowed," as having a raised edge at the wrist wouldn't be screen accurate (this might be an issue with low-grade armor sculpts, which is why it's mentioned int he CRLs)..

In the future, to reduce any confusion, I'll be calling the latter "inside edges" as to not confuse readers between those and the raised "edge returns" required at other places on the armor that obviously should NOT be removed, even when trimming a pieces for smaller troopers (at least not fully).

Sorry for the lack of pictures this post, but there really wasn't much to see besides the thigh shells taped together, which I'll snap tonight before taking them apart and using the Dremel to take out those inside edges. Plus my phone's battery was all but dead from my long ride, and it refuses to take pictures on a low battery. So I'll make up for some pictures tomorrow :)

Monday, February 8, 2016

Back to the Grind (and Score and Snap...)

My son is all right, with a cast and a temp pin in his arm for the next 4-6 weeks, but already getting back to what 4 year olds do, thank goodness. Needless to say that I was occupied basically the whole weekend taking care of him. I finally got a moment to myself tonight.

But while I was spending some time with my son while taking the afternoon off from work, I decided I would try the score & snap approach to trimming the armor, or at least breaking pieces from the molds. And having already seen Trooperbay and others do it on YouTube, I gave it a shot on my thigh pieces, Pieces 20 - 23. All in all, it worked, with very minor slippage of the knife and workable rough cuts.


I cut around the inside arcs of the armor pieces, scored those lines, added relief scores, and popped them out like Trooperbay's method and what I did with the Dremel for the arms. When the score didn't want to split, I just scored it more until it popped. Since the pieces still need to be measured, cut, and fitted before final assemble, any roughness on the cuts doesn't concern me.


After the kids went to bed, I was able to get back into my work space and continue work on my forearm pieces.

One thing I immediately decided to do, based upon the fit and a reference shot of some film-used armor from posted on whitearmor, was to remove the elbow-side edge returns for easier wear and movement. I did this by making some rough cuts with the Dremel cutting disc, popping out those parts, cleaning up with the sanding drum, and finishing with some hand sanding. At the same time, I rough trimmed the strips in order to prep them for after the pieces were assembled, and to make removing the edge returns easier. Results were great.

The key is to fit, adjust, and refit. Remember: tape is cheap; armor is not. If you're like me, you'll probably use a lot of tape fitting and refitting as you go along. That's fine. It's better to measure twice, three, six times, etc., than to accidentally take off too much and permanently screw up a piece, or try to shim it back to fit.

EDIT: also, read this post for clarification between "edge returns" and "inside edges." As the arms pieces include no actual "edge returns," read the above and remainder as referring to "inside edges".


On the left forearm, I removed these edges with the pieces taped together; on the right, I removed them with the pieces disassembled and then taped them together to ensure a final fit. Either method was fine, I discovered.

With the final edge returns removed and the fit finally good, it was time to start assembling the two halves for each arm. I started with the front edge of each piece (the side with the ridged edge). I applied the E6000 to the alread-attached strip, placed the other piece on the strip, checked for alignment, and clamped/ set magnets. Because the raised edges form a valley inside the armor, I was limited with clamping as the larger clamps wouldn't fit into this valley on the left arm; the mold on the right arm was more forgiving and I was able to use two larger clamps on it.


Because I'm going to need to coerce the other edges together using larger clamps, and because I needed all my magnets for the front edges, I decided to only glue the front edges tonight. The back edges will get glued tomorrow once the front edges set, allowing the clamps to "muscle" the back edges together.


You can see the thermal detonator in that shot. Because I want to try to line up the strips on the biceps with the strips on the forearms as best I can, and I can't do that until the biceps are done gluing on both edges (and I REALLY didn't feel like starting to measure and fit the thighs yet), I decided to move away from the limbs for a moment and work on the detonator with was an easy build - and one I modified for extra use :)


I started by reading the instructions and the 501st ANH Hero specs, which go a long way towards telling you exactly how this piece should be assembled, even if you're not planning for 501st approval. After I understood the build, I put one of the caps on the end of the grey cylinder - this would be the left cap. I put the right cap on, dry a line to mark its edge, and carefully removed it. The caps have a super tight fit, but I want to be able to remove the right cap so I can use the cylinder as storage while trooping. After the cap was removed, I used the Dremel sanding drum on low to carefully sand down the right edge of the drum, hand sand with a small piece of sanding paper, and repeat, enough that I could remove the right cap without the contact becoming too loose.


After sanding the edge down to an acceptable level, I put the right cap on and went to the nearest door jam to draw a straight pencil line onto the tube, to line up the metal clips (the door jam trick is something I learned when I built model rockets with my dad as a kid). With the caps and line in place, it was easy enough to place the clips on, mark the holes, drill pilot holes with the drill, and screw the clips on. Later I will probably replace the screws with short machine bolts, nuts, and locking washers, so I can store stuff int eh cylinder without poking it with the screw ends.


With the clips installed, I cleaned up the edges of the control piece and sanded its back. I then placed it onto the grey cylinder (Just resting on the edges of the clip, facing up when attached to the belt, with the round part towards the trooper's right side) and marked with pencil its resting location. I sanded down the area on the grey cylinder for better cement adhesion, applied E6000 to the back of the white piece, placed it on the grey piece, and taped it down with masking tape.


I'm a storage container now, too! :D

Finally, I also took out some of the return edges in the armpits of my bicep pieces for better fit, in a similar fashion as the forearm pieces.


That was it for the night. Tomorrow I'll finish gluing the forearms and perhaps cut out the shin pieces so I can begin working on the legs as I finish up the arms and biceps.