Featured Post

The TKTalkie v4 - Press 6 for the Imperial March

Upgrading - the Path from v3.15 to v4.0 (Note: I had started this draft last year but never finished it, due to personal issues and cuttin...

Showing posts with label Thermal Detonator. Show all posts

Thursday, May 18, 2017

Upgrade: Making a Better Thermal Detonator

Special thanks to KMan for keeping this resource on the Anovos FB group!

Something I did recently to my Anovos kit was make the thermal detonator more screen-accurate.

For those not in the know, the ANOVOS TD is slightly too long due to the gray tube being a little long and the white control panel being a little short compared to other armors. Here's the CRL info from the 501st for ANH stunt armor:
Thermal Detonator
For 501st approval:
  • (A.K.A. O2 canister) attaches to the center back of the belt.
  • Detonator consists of an all grey cylinder, without silver stickers or silver paint.
    • The cylinder is between 2” (50mm) and 2.68"(68mm) in diameter with white end caps on each end.
  • The white control panel pad faces upwards, with the controls/round washer style detail closest to the right end cap.
  • The total length is approximately 7.50" (190.5mm).
  • The thermal detonator is attached via metal or metallic-appearing clips, approximately 1" (25mm) wide.

For level two certification (if applicable):
  • Thermal detonator belt clips are positioned with little to no gap between the clips and the end caps.
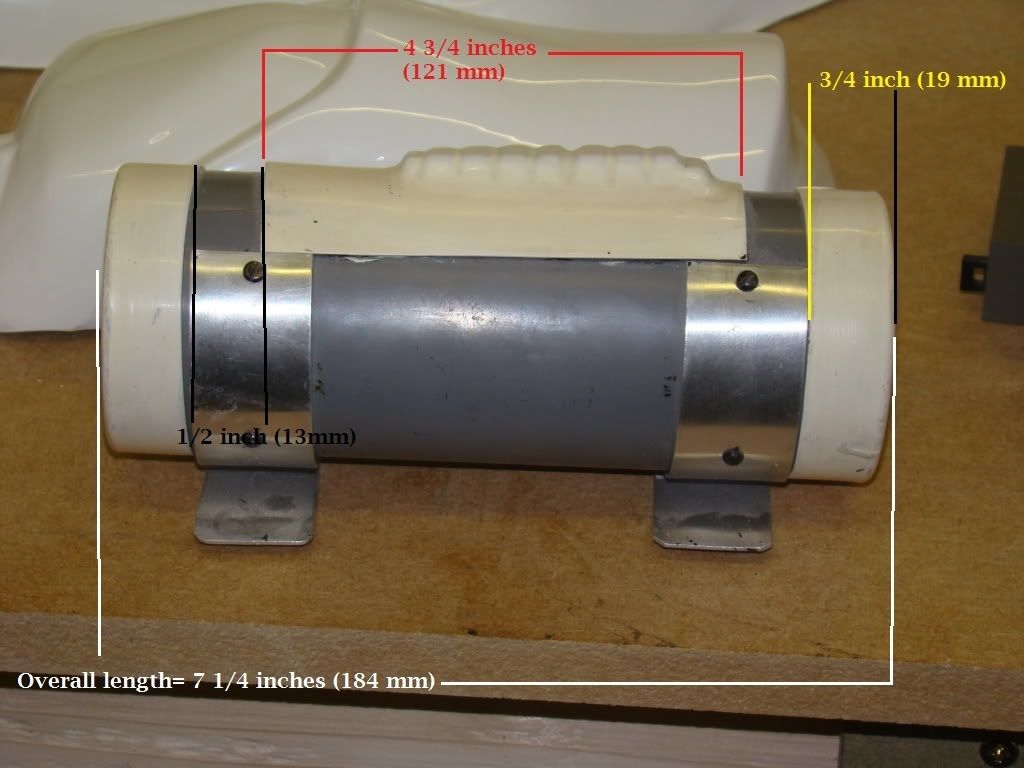
As far as a more screen-accurate version goes, for those hoping for EIB or Centurion status in the 501st, this diagram depicts proper measurements for a TD (courtesy of UKSWrath on Whitearmor.net) (click to enlarge):

Screen-used prop reference
(posted by USKWrath on FISD (whitearmor.net))

Most important is the overall look of the TD; if there's too much gray showing, it will affect EIB and Centurion approval. Further, the screws will come into scrutiny as well, since the Anovos-supplied screws for the TD aren't screen accurate to those used in the original prop. Take my finished TD for example (this photo is from its original final assembly):


That's a lot of gray showing compared to the TD in the 501st CRL or the screen-used prop. Approvable? Yes, but only for Basic.

Edit: the main thing keeping the Anovos TDs from higher approval is actually the screws. There's more info on that later in this post.

The overall length for most Anovos TDs is about 7 3/4", whereas a more accurate TD would have an overall length of 7 1/4". That's a difference of half an inch, which might seem trivial but will be noticeable to those looking at approval pics for EIB or Centurion.

Note that, as USKWrath notes in his build, the Anovos-supplied TD control panel is slightly shorter than the ones used in screen-used props. They key is the overall look. Like I mentioned above, as long as there's not too much grey showing, the small discrepancy won't affect your eligibility for EIB or Centurion.

Thankfully, cutting half an inch off the tube is trivial, whether you're building the TD for the first time or rebuilding it like I did. For the former, you can simply cut all the extra off of one end. In my case, I had to make two cuts, but with a Dremel tool it wasn't terribly hard.

I first started by disassembling my TD of all parts except the control panel, which I glued on with E6000 in the original build and didn't want to move, since I had sanded the gray tube underneath it for better adhesion.

Next, I measured 1/2" form either side of the control panel to mark where the edge of each tube cap would need to rest. Then, I put the tube cap back on each end and marked that. The space between that mark and the 1/2' mark was the difference I'd have to remove from each end in order to have the cap rest at the correct spot.


After measuring the difference, I measured the same distance from the end of the tube, and then wrapped scotch tape evenly around the circumference of the tube's end. After that, I simply cut along the edge of the tape with the Dremel tool until I had cut around the tube. I then duplicated the process for the other end of the tube.


The screws:
As I mentioned earlier, the screws supplied form Anovos aren't screen accurate for the TD but, ironically, the ones they use to construct the helmet are. Since I had long since replaced my helmet screws with more screen-accurate screws, I had saved these old bucket screws for this project.

First, I measured out where the new screw holes would be for the TD belt clips but putting the end caps back on and penciling where the holes would be with the clips flush against the tube in the correct location. Thankfully, the clips would cover the old screw holes, making those a moot issue once I did a little deburring with a knife to make them more level with the rest of the tube.


However, since I still plan to use my TD as storage, I needed to shorten their length. So I used the cutting disk on the Dremel to do that while holding the screws with needle nose pliers.


Once that was done I used a piece of scrap foam and some masking tape to set the screws into, and then painted the screw heads the correct color with Testor gloss black paint.


While the paint was drying I carefully drilled the new screw holes into the gray tube using a very small pilot hole, then a slightly large bit to match the screws' diameter. Once the paint was ready, I removed the end caps and carefully bolted the clips onto the tube with the new screws and washers and carefully re-touched the paint on the screw heads.


I also sanded down the right edge of the tube to make removing and replacing the cap easier for storage. The cut-down bolts will make it easier to add and remove items with less chance of snagging, but I might spring for some crown bolts in the future to cover the ends of the threads.


Sure enough, the detonator is now about 7 1/4" long :)

Compare the before and after shots, and then the CRL reference picture:

Before

After

CRL Reference

The Anovos TD still shows more grey than the reference picture because the control panel is shorter than the screen-used prop, but it's now showing far less gray and is the proper length. FISD won't make Anovos troopers buy new control panels as this is a minor issue and is fine even for Centurion approval.

My next blog entry was going to be on the TK Talkie v3, but first I'll probably be covering my ever-cracking chest plate, and how some troopers reinforce problem areas to add strength and reduce the possibility of cracking, especially with thinner armor like the Anovos suit. Until next time...


Saturday, April 9, 2016

Final Touches Pt 1 - Let's Touch ALL THE PIECES

As I get into the final stretch of this build before submitting for the 501st as IEB (Tier 2), I need to correct the issues I found during my last fitting.


First, I started with the rivets on the left side of the armor. I scuffed up the heads with 350 grit sandpaper, being careful not to scuff the armor, and then painted them gloss white per the CRL.

Next I wanted to tackle the extra Chicago screws in the belt that are not in the Stunt CRL but have been installed by ANOVOS. Instead of removing them and covering up the holes, I doubled down and not only kept them, but added washers to the upper two. The reason behind this was that I've already seen the two remaining screws tear through a few ANOVOS belts, so I wanted to keep all the screws to give the belt extra strength - not only that, but reinforce the upper two screws, as I was going to cover them up with iron-on patchwork.

My main issue is that the patch I had was too white. So to rectify this, I made a tea bath to stain the patch off white; then, I soaked the patch in the tea bath for less than a minute.


The patch came out a shade darker than the belt.


I ran it through a slight bleach soak. After that, it was about as right as I could get it without messing it up. But before I installed the patches, I installed the washers with the Chicago screws. Then the patches were installed over all that hardware.


I also took the time to put some loop tape over the hardware on the back of the belt, as the screws and rivets scratched my armor during the last fitting.


I gave the clips on the thermal detonator a similar treatment.


One of the things pointed out during my fitting was my wandering right shoulder strap. Without the elastic loop to keep it in place, it wanders too far center (at least I'm hoping so; otherwise I'll have to remove and re-glue it). For those loops to work correctly, though, I'll need a wider cloth shoulder strap underneath it.

the Stunt CRL for Centurion specifies that the cloth part should be white, preferably elastic. This being the case, I decided to take the plunge, deconstruct the ANOVOS shoulder straps, and replace part of them with white elastic. First I took 2' wide elastic and cut two lengths equal to the length of the current ANOVOS straps. I sealed the ends with CA glue to prevent fraying.


Next I took apart the ANOVOS straps by cutting the threading with a hobby knife; then I used those pieces along with the white elastic to make the new shoulder straps. I hate sewing, though, and decide to use E6000 to glue everything together.


After letting them site for a day, they came out very good. I simply needed to use some extra glue and magnets to tap down some stray corners.


Besides that, I also:

*Added elastic cinches to my TK Boots to make getting them into the shin armor easier (loop tape on the heal helps with initial placement and tightening)


*Trimmed the hand guards down for better presentation (untrimmed one on left, trimmed one on right). Used a hollow sanding on the front and back to add some curvature for better fit.


* Cleaned up the eyes of my bucket with the Dremel sanding drum, a hobby knife, miniature files, sand paper, and raw nerves (messing up was not an option).


* Refitted the sniper knee for better fit (NEEDED MORE CLAMPS):


* Cleaned up the right shin from a mis-installed sniper knee (thanks Shingate!)


* Glued down the final edges of the flannel I installed on the bottom of the shins to prevent damage to Te TK Boots


* Painted the rivets and gluing down the ammo pack on the right thigh


* Covered up the inside ends of the split rivets with low-temp hot glue to avoid catching on the undersuit (or my skin, for that matter)


* Cleaned up the ABS paste fill I did on the bottom of the left thigh to get rid of a huge armor gap


* Added some strap loops inside the chest piece for my Pyle Pro amp, using spare ABS from the kit


Finally, I also worked on the fan system for my helmet. I finally determined where the fans would be placed. I measured and marked the blank for fan placement. Using one of the fans and a Dremel burr, I marked where to drill the mounting holes, and then used a drill but to drill them out. I also used a Dremel cutting disk to mark a cut-out for the fan blades, but not how you might think. The disk only provided the stencil.


Using the drill and a drywall bit, I was able to remove the circular section; then I used the Dremel sanding drum to clean it out.


I then marked and cut a square hole for the switch in a similar manner, using a hobby knife for the 90 degree corners. The holes to either side of the square cut-out will be used to mount the switch to the blank.


Lastly, I clean the blank of burrs, sanded it, and commenced to coat it with PlastiDip spray.


That's it for tonight. And after tonight, the only thing I'll really want to do before sending approval pics is finish the fan system and get the Pyle Pro mounted in the chest piece. I eventually want to PlastiDip the inside of my bucket, but I plan on doing that after approval (if I mess up, it will delay me getting good approval pics).