Featured Post

The TKTalkie v4 - Press 6 for the Imperial March

Upgrading - the Path from v3.15 to v4.0 (Note: I had started this draft last year but never finished it, due to personal issues and cuttin...

Showing posts with label ukswrath. Show all posts

Tuesday, November 14, 2017

Why I Decided to Sell Stuff

To all my fellow veteran troopers, friends, and readers, thank you for your service on this belated Veterans' Day and Remembrance Day.

If anyone's visited or even heard of the Scum and Villainy Cantina, they'll know it was the vision of a big fan who wanted to build something cool and offer it as a service to fans. It's really a great place and I personally love it. I went there when it was just a pop-up bar and afterwards when they decided to stay open indefinitely.

Now I hear word of another Star Wars themed bar that will be popping up in Hollywood (as well as New york and DC) and wondered why somebody just couldn't come up with their own original idea and let things be.

And then I got it. I understood. To a point.

Last week (last post), I decided to post in general about products that I am making that are similar to those being produced by UKSWrath. There were some that called me a recaster for what I was trying to do. Although it was wrong of me to knock his price points or in any way demean his product, the situation started with events on FISD that caught my attention.

I've been apprehensive about publishing this post, but ultimately this is my personal blog, and a space that I feel I should be able to talk about topics I want in regards to my armor builds and overcoming difficulties in the build, even if those difficulties are more social and less technical.

An Apology to UKSWrath / Tony

Firstly, while I have done so privately, I'd like to apologize to UKSWrath / Tony for besmirching his work. Even though we use off-the-shelf tech for these systems, they are very tedious to make. Adding other items like more quick connects makes it even moreso and, frankly, I should probably be charging more for my work (and I probably will) since it can take a few hours to put together a hearing assist system from start to finish (installing it can take another hour or two, depending on the buckets). If you've read my previous blogs, you know that the hearing assists have to be built component by component, by each resistor, capacitor, and jack. It's certainly no easy task for anyone, especially someone who builds a lot of these devices each month.

When I announced that I intended to sell my own product to people through the Anovos Facebook group, I knew there might be consequences. Heck, I'll admit that not talking to the person already making fan kits on FISD/ Whitearmor, and knocking his price point was probably not the best way to go about it, do the general attitudes in the cosplay community about people who "recast" or make clone items, or people who don't "respect" the work of those already doing business.

Being First to Market in the Cosplay World

Although Tony might not have been the first guy to figure out how to make hearing assist (because I honestly don't know), he was arguably the first guy to offer them for sale on FISD. Out of respect for the guy that did it first, members generally don't compete with other members doing ongoing sales for the same or very similar products. Some could argue that this creates a monopoly. Could I compete with Tony on FISD? Sure, but arguably we're currently making very similar products. Do I want to deal with the drama or politics that entails, or being the pariah of FISD? No. That's far too stressful.

And seeing my artist friends who constantly have to fight off other artists, or even large corporations, from keeping people from cloning their ideas, I completely get that.

But as a guy who feels like an artist who was plagiarized, I also feel it.

The Hearing Assist Filter Issue

When I was a child our school hosted a craft fair. I found a salt dough recipe for my best friend and I to make little Nintendo character knick knacks to sell at the fair. In the end, however, he took the dough recipe, made them himself, and shut me out.

If anything, the thing with which I took issue and led me down the path of selling my own product, beyond my wife being unemployed for a few months, was developing an improvement on an old design - not reinventing the wheel per say, but making it easier to roll.

One of my big issues was the noise filter in the hearing assist systems, and its commercialization. While I argue that the final result was because of my published work, UKSWrath will argue that he'd been looking for the solution for a while and had spent quite a sum of money looking for the right combo of filter and USB battery to work with the hearing assist without producing EM noise if fans were also being used on the same battery.

That being said, I don't know if I wholly believe in the coincidence. Those who read my blog will know that I initially found a solution to the EM noise issue (running fans and a hearing assist on the same power supply) was published on 29 November 2016, after messing around with my hearing assist build for days and taking a break for Thanksgiving.

Tracing the threads from Whitearmor alone is suspect:
  • I started talking about my solution on 2nd March 2017 when I saw a thread about a FISD member in the UK trying to do what I had already blogged about. Before this, USKWrath had said it couldn't be done, despite having spent $200 researching the issue.
  • I finally published my work on 11 May 2017 on the same thread. 
  • Thereafter, around 22 May 2017, USKWrath started selling a 5V USB-powered Hearing Assist with an EM filter on his Sales thread.
This is the reason my hearing assist is similar to his because, arguably, I developed the concept first.

My Outstanding Objection

When I originally saw the Velleman MK136, and thought it would be great to add to a bucket, I Google searched the idea and and read up on Tony's threads (among other sources) to improve my design Similarly, Tony probably read up on my work and improved his designs.

The difference is that Tony does so commercially. And while I posted my ideas in the hopes of showing off my work and helping others builders (arguably builders that couldn't afford Tony's work) overcoming similar issues, my intent wasn't to help somebody else earn a profit on my work. Anyone who's an artist, creator, or inventory can understand. And although he reportedly spent a lot of money in R&D, I honestly don't think he could have made that final breakthrough without my contribution.

No Right Answer

Obviously Tony and I aren't the only ones making product or publishing work. Many people reference this YouTube video from 18 July 2012 about helmet electronics, which was also a huge inspiration to me. There are guys who've been making fans "for years" coming out of the woodwork. Some of these people, like the FISD members who handed down the Echo Fan business to USKWrath, work for a profit, some don't. But those that do have arguably been inspired by, or used work from, others before them. People have been borrowing and improving on each other's' ideas since the dawn of time.

Personally, I'm a fan of the free market, competing by price point and innovation, and letting customers decide. But when we start dealing with loyal fanbases, the muddled idea of originality, and trying to break into inferred monopolies where somebody who's already established is being infringed upon, it's a large ball of worms.

Going Forward

I respect Tony, and don't doubt that he spent a bit of R&D trying to figure out how everything works, but to be wholly honest, the timing was and is suspect. Arguably, he just may have figured out one particular USB power bank that works well with the solution I penned.

However, out of respect for Tony, I've decided to not broadcast my sales to FISD for the time being.

Instead, I will do limited commissions on a case by case basis. You can find my Sales page here:

https://obsidiustk.blogspot.com/p/tksnakes-5v-systems.html

There will always be competition for any builder, like those improving on old designs or creating wholly new systems that could undercut what Tony, myself, and others are doing. But I also believe that there will never be a "one size fits all" solution, especially when it comes to price point. New systems are typically priced higher for customers that need the bleeding edge. People who can't afford that will get the next best thing. Although there might be systems in the future that can replace the MK136-based designs, there's no telling when they'll be to market, or how expensive they might be.

In that same vein, I also intend to diversify my product offerings by making products different from those sold by Tony and others. I'll be looking into different fan offerings, cutting down on feedback when using hearing assists with helmet speakers, etc. Consider the hearing assist EM filter as the first in a series of innovations to come.

Adversely, this lamentably means that I will be remiss on blogging about helmet electronics or construction methods, since I'm not interested in any further ideas being used for somebody else's business venture. If someone is going to make earnings off of my innovations, it will be me and those with whom I select to partner.

I'll be putting my current two products (and others to come), on a page connected to the blog as to keep that page updated. Because this blog was originally meant to be about building armor, this will probably be the last time I blog about my products unless I have to announce a change to page host or URL.

Next blog, I hop to have something more positive or lighthearted to talk about. Until then...

Friday, August 12, 2016

Industrial Velcro and Rebuilding the Belt

This is a long blog post that covers a couple of troops and related modifications and repairs as a result of wear and experience.

To start , I participated in a great, giant troop with the OC Squad (and other Southern California Garrison members) at the OC Zoo in the Irvine Railroad Park. There were about 50 members there between the 501st and Rebel Legion, as well as a few anchor characters like Rey, Vader, and Kylo. It was a lot of fun!


(With celebrity (pig) Kevin Bacon!)

It was a great troop, but it was a bit warm. I'm glad I had some spare white duct tape in case of emergency, because the ANOVOS H&L tape on my shins just couldn't take the heat. After the fact, I had a mess to clean up between the crap H&L tape and the adhesive from the duct tape.


To clean up, I used orange oil, Simple Green, and finally rubbing alcohol to prep the contact areas for some new industrial strength Velcro that I purchased at Home Depot.


After the clean-up, I cut the Velcro to the proper length and width, I carefully placed it onto the shin closures.


I've trooped in it once since then at San Diego Comic Con; we went even though we couldn't get passes for the con itself, because there's a ton to do in the Gaslamp district outside of the con - plus there was a 501st photo shoot Saturday morning for the Imperial Sands Garrison in which I wanted to participate, so it was the perfect excuse to troop! The shins held up very nicely, even when I had to run to the photo shoot at the con when I almost ran late trying to find it.

The serious photo

The fun photo

The really fun photos

My pauldron with a vinyl sticker I had made for the event. I ended up needing to use extra tape as the heat the previous day caused the edges of the vinyl to curl.

Trooping the con made me realize that I needed to replace the H&L contacts in my thighs and shoulder bells with industrial Velcro as well, as they were starting to separate from the armor. I removed the old H&L tape, cleaned the armor like I had for the shins, and then put in the new industrial Velcro.


The snaps for my thigh garters were slightly bothersome too; if they end up not working after this Velcro replacement, I may try to adjust the snap tension using some pliers, or modify it to be more in-line with a "traditional" belt garter system.

The other casualty was the floppy ANOVOS belt. one of the lower Chicago screws tore through the belt. I'd planned on eventually replacing it with a Rob Kittell belt from www.imperialissue.com, and it seemed like now was the time, especially with the annual squad photo shoot coming up this week and an opportunity to get pictures for my trading cards.

I had previously planned to shim my ab armor to fit around my girth, but after measuring my belly some weeks earlier to plan for this project, I was disappointing with my physical fitness. My wife had started a daily workout and nutrition regimen a couple of weeks earlier, so it was then I decided to join her for workouts in the mornings and to start watching my portion, especially carbs. Within a month I had lost more than a couple of inches form my belly, making shimming he abs completely unnecessary. This was also good because I wanted to get my ab sizing straightened out before ordering  the new belt, to ensure I had a belt the correct length.

I ordered his standard 40" belt online and it arrived within a few days - great turn around for flat postage. The belt was as advertised, at 40" with an extra 10" of overlap for the Velcro closure in the back for a total of 50". It has two canvas layers sandwiching a plastic center that gives it a lot more rigidity than the canvas-only ANOVOS belt. This also makes setting up the belt for ANH Stunt easier as the holster is only supposed to be fastened to the belt with two rivets/ Chicago screws instead of the four used by ANOVOS, which would be more inline with the ANH Hero trooper instead.

The first step was to lay the new belt out and mark where all the new holes would go for the snaps (to fasten the belt to the ab plate) and the rivets (to fasten the plastic ammo belt to the new canvas belt). I covered the inside of the belt with blue painters tape so I could mark up the tape - it would be easy to punch through with leather punches and remove before fastening snaps and rivets.


I started with the center at exactly the 25" mark , 1.5" from either the top or bottom as the belt is 50" long and 3" wide total. This would mark the rivet for the center of the ammo belt. From here, snaps were marked metrically at 17cm from center; the end rivets for the ammo belt were 20cm from center. I'd worry about the two holes for the holster closer to final assembly.

Next it was time to cross the Rubicon and remove the elements from the old ANOVOS belt. Knowing that the rivets fastening the ammo belt to the canvas were terrible to remove, I decided to at least get the ammo belt off the canvas by simply cutting it off the belt, being careful to avoid the elastic of the drop-down ammo boxes. I also had to do this for one Chicago Screw for the holster as it was incredibly torqued and refused to unscrew until I had removed it through cutting and was able to holder the other end with pliers.

Yeah, there was no going back now.

So now was the "fun" part - removing the old rivets from the plastic ammo belt and removing the cover caps from the front. I've read horror stories from the ANOVOS builders FB group and also seen UKSWrath's write-up on his belt. I'd also heard that some people weren't cursed with a crazy amount of pink epoxy and were able to remove the rivets and caps with relative ease.

Unfortunately, dear reader, I wasn't one of those people.

From the onset, I could tell that the caps were glued on with a large amount of pink epoxy (the smell of it reminds me of the stuff used in dentistry to create molds or fasten crowns to teeth). The first thing to do was to remove the rivet on the back of the belt using a Dremel. I used a cutting disk to care a cross into the rivet head so it could be easily remove with pliers and then ground down more.


You can already start to see some deformation in the ABS in the shot above right. Lamentably, in a situation like this, it's not about removing it without damage, but mitigating the amount of damage required to finish the job, to make repair easier.

I hit this epoxy with everything I had, from a butter knife like UKSWrath used, to a heated putty knife, to a cutting disk (this was far too risky and may have caused even more damage), to a sharp knife (I abandoned this for risk of personal safety) and a hobby knife (the blade wasn't long enough and the textured grip was causing too many scratches). I did the best I could, but in the end I had to pry up the last bit of the cap and rip out part of the ammo belt to get them off.


The center cap is always the hardest for anyone given the lack of space to attack the cap from the side. In the end the ammo belt backing was deforming so much that I cut relief cuts into it from the back to mitigate damage. Obviously this left a big chunk missing that would need to be repaired with scrap ABS and perhaps even paste to ensure the cap covered up any other blemishes.


Out of all of this, at least eh caps were removed without breaking, as those are more difficult to repair. I just had to take the Dremel grinding tip to them and clean the epoxy out from inside the caps to ensure they had enough room for whatever mounting hardware I decided to use.


It was a dusty job. Remember to wear a mask folks!

With the caps cleaned out, it was time to start repairing the ammo belt. So I dug into my ABS trimmings and found some pieces to CA glue on to the backside of the ammo belt. I clamped them into place for about 10 minutes to allow the CA glue to cure (I don't currently have any Zip Kicker).


After the glue cured, I went in from the front and filled in the craters with some spare ABS paste from my thigh piece rebuild. That was it for the night, so I decided to let the paste fully cure before resuming work the next evening.


The next evening, I spent an hour sanding down the ABS paste smooth and then polishing, with the help of 100-150-350-600-1500 grit paper (the latter two wet) and Novus 3 and 2. Still some light scratching, but otherwise not bad. The perfectionist in me could spend another hour removing all the light scratches, but I needed to finish tonight to give the E6000 time to cure before Saturday.


I had punched the belt holes (using leather hole punches) and put the snaps on the belt the previous night: I simply used the General Tools Brass Snaps and Fastener I used for the snaps on the ab plate, but the female counterparts on the inside of the belt, again with each snap 17cm from center on each side (34cm total). The new belt fits exactly like the ANOVOS belt, but it's obviously more rigid.

For the ammo belt, I fastened the center using a standard leather rivet with a washer on the back of the snap, to give it more support. I fastened the rivet backwards, with the rivet head on the inside of the belt, as this way was far easier to tap in given the shape of the ammo belt. The bonus is that the rivet head is far less likely to scratch my armor than the rivet back.

For the ends of the ammo belt, I used tow of the four Chicago screws from the hostler, since it was only going to need two of them for the Stunt mounting. I chose Chicago screws for one reason: as a stretch goal, I might alter the costume to support trooping as a Heavy Weapons Trooper (HWT), which don't have drop-down ammo packs on their belts. Using Chicago screws will allow me to unfasten the ends of the ammo belt to easily slip off the drop-downs if that ever happens.

When finished, the assembly was as good as new, on the new belt.


Now it was time for the holster. The first thing to do was remove the two extra holes at the top of the holsters. I measured 2.5" from the top of the holster and cut off the remaining leather, leaving only two mounting holes for the Stunt mounting. I also measured center-to-center on the bottom rivets to get the spacing correct for the belt holes - the measure is 5".


For the belt holes, UKSWrath used different measurements for his holster holes, but I opted to use the ANOVOS belt measurements and fasten the holster slightly higher using a 3/4" measure from the bottom of the belt; this also gives the rivets more purchase on the plastic stock inside the Kittell belt (this should NOT affect being able to apply for Centurion status). Because I had almost exactly 7" between the edge of the ammo belt and the edge of the Velcro, I decided to split the difference and give 1" from either side, which still put me very close to the ammo belt but not too close to the Velcro.


I marked the holes directly on the belt using a pen and very small marks, put the holes into the belt, and mounted the holster. You can't argue with the results - A very clean, strong mounting with all the pieces secure and fit for ANH Stunt CRL.

Edit: when using Chicago screws for the holster, try to use blue thread locker, which you can get form most hardware or auto parts stores. This will keep the screws from becoming loose and falling out, since it's hard to torque them down without deforming the flat threads (which also might cause them to scratch your armor).


Lastly was replacing the rivet caps on the ammo belt, this time using some proper E6000  in case of future maintenance. Before I did that, I CA glued the caps of the Chicago screws onto either end of the ammo belt, to keep them from floating off if I ever need to unscrew them for possible future HWT conversion.


After the CA glue cured, I carefully placed E6000 on the back of the caps and glued them back into place, about 1.25" from either edge to get them as centered as possible, with perhaps 1/4" at most away from the edge of the ammo belt for the caps on the ends.


So I should now be set for this Saturday, and one step closer towards going for EIB and later Centurion certification. For the latter, I still need latex hand guards for the rubber gloves, but I'll source these later as to spread around my purchases. I've already ordered more split rivets to correct the rivet spacing on the left side of the ab armor. Both will be covered sometime in the future on this blog. Until then...

Monday, March 21, 2016

Oh, snaps! (And rivets, and ABS paste...)

So I did a bit of work over the past couple of nights. Where do I begin? Probably with the ab plate this time.

The instructions and 501st CRLs call for a snap in the upper right of the ab plate. I followed UKSWrath's blog for more details. Marked the hole, double-checked the measurements, drilled, and tapped the rivet, male end towards the inside (to snap to the strap). Easy.


I needed to start getting the torso plate ready for strapping. Now, if you're using the ANAOVOS instructions, you'd just toss some H&L tape into the left side of the torso and call it a day for that side. But as it is, I (eventually) want to try for Centurion some day (I'll probably have to settle for EIB for the moment due to budgetary concerns, and not wanting to replace the belt just yet). This means that you need three MORE rivets on the ab plate's left side to correspond with the three on the kidney plate. At least ANOVOS gave me PLENTY of spare split rivets :D


Now, where you measure from top to bottom is debatable. UKSWrath does it one way, but since I started out with the kidney plate and am a noob to this, I did it another way. Fortunately, it doesn't matter so long as the rivets or 10cm from the edge of the plate and evenly spaced. This is because the belt will cover up the bottom rivets anyhow. The 501st will accept them in either configuration (if that's your goal).

So instead of having to re-do the kidney plate rivets out of OCD, I kept them as-is and drilled the holes in the ab plate to match. I first lined up the kidney plate, made marks for approximation, verified the measurements on the ab plate with a rule, and drilled.

Now it was time for the groin snaps. Wait... the split rivet is supposed to go in the cod plate, NOT the snaps? ... well f**k.


Yeah, I messed up. Thankfully, snaps are easy to remove with some pliers and "gentle persuasion" (and I have spare #6 snaps from my snap anvil set), but the holes don't exactly disappear with an eraser. And even if I keep one of the existing holes, the other has to go bye-bye. I'll have to make some ABS paste.

Until then, I can get the snaps in the proper piece - the "posterior" (butt) plate. Easy peasy. I drilled a hole about 20mm from the edge of center, then another hole 20mm from that, to match the strap supplied by ANOVOS. Then I set my snaps. I ended up using the snaps that came with my snap anvil as they worked better and match the snaps on the strap.


At least the snaps are in the right place now. In my butt... plate.

Now for the shoulder strap plates. During the armor party, the sqaddies advised us that these straps just love to snap in half lengthwise while trooping, and advised us to reinforce them with scrap ABS on the underside. That being said, I had plenty of scrap ABS, but wanted to match the shape of the straps as much as possible. I tried a heat gun at my office but encountered some "baconing" (where the edges of the pieces start to look like cooked bacon). So I had them take a hot water bath.l


This was challenging for me as a novice builder, but worked out as I was subjecting scrap ABS to the hot water bath as opposed to "real" pieces. What I did was soak the scrap in boiling water for 30-40 seconds, removed the piece, and formed the curve to the room-temperature shoulder straps by hand using my Gorilla Grip gloves. I further used the old rolling pin to remove baconing and any other warp. Each scrap required a few passes. I found it's better to be slow and methodical than to try to rush, lest you ruin the piece and have to start over.

Once the pieces were finished being curved, I used the Dremel sanding drum and sanding block to remove an leftover warping, then glued the pieces under the straps with several clamps and plenty of E-6000.


Later in the evening I went to Home Depot and picked up some industrial acetone for about $8, to start making ABS paste.

Only one of these items is for human consumption.

In a nutshell, here's how you make ABS paste:

Get a glass jar. Add some cut some scrap (make sure there's no clear protective film first; it won't dissolve in the acetone), add acetone until pieces are slightly covered, and then wait a few hours, mixing occasionally with a metal or wood stirrer. Once applied, it dries pretty fast. One can probably work with it in a few hours after you put it on, although I've been waiting 12+ hours due to real life.

But while that was setting up, I decided to work on another part of the ab plate - the snaps for the belt. Using a mix of the instructions from ANOVOS and UKSWrath's guide, I put my marks at an ideal height exactly 170mm from center in each direction (340mm or 34cm total from snap to snap) at a height determined by using a clamped straight edge as a guide line.


I also placed the belt over the plate as I wore it to ensure the snaps would line up.


After triple-checking, I drilled the holes and set the snaps. Now, getting the belt onto and off of these snaps is a pain - it's like the crimped the snaps on the belt stiffer than those on the ab plate straps (which use the same size snaps). I applied a very very slight amount of WD40 to the male snaps on the ab plate to help hasten them, which seemed to help a bit. When donning the armor, you'll probably want to fasten these snaps BEFORE putting the armor on, and unfasten AFTER you take the armor off, to avoid damaging the plate. But yes, the belt fit just fine with the measurements as described above.

Now that the ABS paste was set up, it was time to cover the one hole in the cod piece. I applied paste to the hold and both sides of the plate, using a scrap ABS piece as a scraper to control lumping.


Time to let that set.

Working with the belt, I found it flaccid, to say the least. So I took the advice of other ANOVOS builders (beyond replacing the cloth part of the belt outright) by gluing the ABS plate to the belt, and applying clamps and magnets.


Since the top is the part from which the cloth will hang, I clamped the top foremost, and used magnets elsewhere. That should help stiffen up the belt for now, and allow me to replace the cloth with a Kittle belt in the future. This is because, according to UKSWrath, the stock ANOVOS belt won't fly for Centurion status, even modified (I still need to remove or cover up some of the holster rivets for Stunt cert). But I don't have $40 to spend just on a belt at the moment, so that will have to wait until later. For now, this mod will get the job done for at least Elite certification (once I take care of those rivets).

That's it for now. I was able to get started on sanding the ABS paste on the cod, but because the snap had left a circular score ring, I had to sand down again and apply a second coat (no pictures). Next session I'll probably be finishing up that area and finally getting the strap and split rivet in place. once that's done, I can apply the left and right straps for the ab and kidney plates, and then the butt, chest, and back plates, then the limbs, and then... close to done? We'll see.

Until then...

Friday, March 18, 2016

Rally Round the Thighs and Split Rivets

At the beginning of the week I was beset by The Cold From Hell. Added to that the DST change, and I wasn't able to get much work done until last night. But I was finally able to rally last night to get some genuine work done after getting the kids to bed.

I hadn't unpacked my armor or tools since coming back from the armor party on Sunday. After getting my work space prepped again, I started tearing stuff out. Noticing that the H&L on one of my shins doesn't like to stay in place; may have to E-6000 that stuff later.

Edit: DO NOT trim thighs for length until the end of your build. Mistakes were made. Consider the following a cautionary tale.

For now, I'm looking at the thighs (again) and a conversation I had on FB with a fellow builder. Last time I touched the thighs I heavily trimmed the front down. Here's what they look like coming out of the armor party, both being trimmed in the front:


Mind you, I'm not messing with the inseam, which seems to be fine for me, but rather the peaks on the fronts and backs of the thighs where the shells come together. I realize that they are poking me in the... posterior.

So I decided to take off the first inch or so for about 11" in length in the rear (the front for bother pieces is about 13.5" for me).

Before...

... and after.

The belt sander would have been nice, but I was able to do the sanding with the Dremel sanding drum and the sanding block after cutting with the Dremel cutting disk.

Since I was on the subject of the thighs, and wanting to handle split rivets in a proper fashion, I decided to put on the right thigh ammo pouches, which attach near the knee. Using UKSWrath's guide, I found placement not too difficult, although liking symmetry, decided to center the center pouch on the thigh's front strip.

First I drilled the holes on the pouch at the indents provided on the piece. I placed scrap wood underneath as to not drill into my work table. This would also come in handy later for setting the split rivets.


Once the holes were drilled, I used the piece to help determine where to drill the holes in the thigh piece, with that center pouch lined up just so.


After measuring more than a few times, it was time to drill holes in the thigh. I decided to do this one hole at  a time, wherein I would drill the first hole, mount and rivet that side of the pouch, and then repeat on the other side, to ensure a good fit. After a gut check, I drilled.

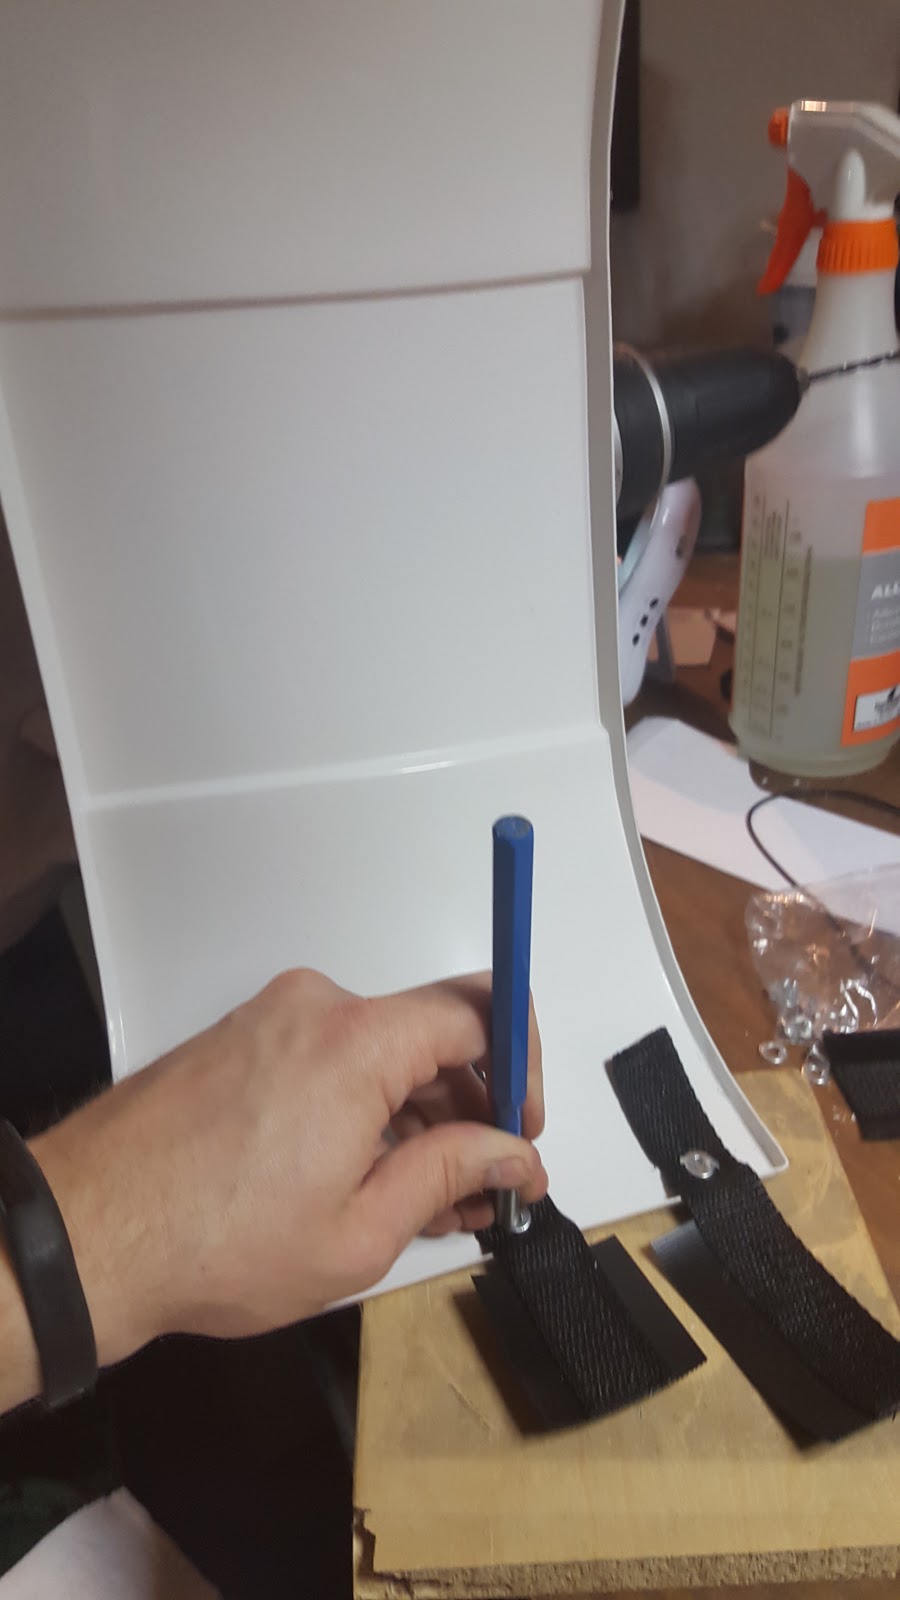
With the first hole drilled, I took to setting the split rivets, using three primary tools - a standard screwdriver to split the rivets, a metal tap to flatten the splits, and a plastic mallet to prevent damage to the two aforementioned tools.

The sanding block was there for moral support.

Splitting the rivets on the already-assembled thigh piece was challenging, and probably not a great place for someone with less experience to start. But I've had plenty of experience with leather work, rivets, and snaps, so having the right tolls (unlike at the armor party), I set off with care.


Getting the screwdriver in the area was trick, but I was able to get just enough of a split to start working with the tap. The trick with the tap was to turn the rivet after ever few strikes in order to ensure that both sides of the rivet were being tapped down as equally as possible. A pair of needle-nose pliers helped rotate the rivets since the ends can by point for fingers. After some work, it was pretty.


I repeated the process on the other side after again measuring placement and drilling the other hole. Once finished, the ammo pouch was done.


Since I was on the subject of split rivets, it was time again to revisit the kidney plate. I mangled one of the split rivets when I tried to start the strapping at the armor party. THANKFULLY, ANOVOS gives you extra rivets, in case you screw up one or two of them (like yours truly). So without reservation, I carefully cut off the mangled rviet without hurting the kidney plate or strap.

The kidney plate has three straps, although the top strap doesn't look like the one depicted in the instructions (but the odd strap is the only one that doesn't match any other straps, so I was able to deduce its purpose).


These straps require you to place a hole in them, a tricky prospect without fraying the fabric in the process. The best way to do this, I found, is to use something that will sear the hole and minimize fraying. So I made the holes with a soldering iron.


With the soldering iron, I had to be quick to ensure I didn't make the holes too large - larger than the rivets for easy of installation, but smaller than the washers. But the iron made quick work, once I figured the location of the hole for each strap. I unplugged the iron and set it aside as to keep it far away from my impending kidney plate.

Using the drill gun as a support, and the scrap wood underneath as for the thigh rivets, I easily placed three split rivets through the kidney plate and each strap.


Note that I'm placing the straps close as I plan to have no gap between the ab and kidney plates, which fits me just fine and is required for 501st Centurion anyhow.

Having made enough noise in the garage, I left the last split rivet (in the butt plate) and other strapping for another evening. Until then...