Featured Post

The TKTalkie v4 - Press 6 for the Imperial March

Upgrading - the Path from v3.15 to v4.0 (Note: I had started this draft last year but never finished it, due to personal issues and cuttin...

Monday, April 8, 2019

The Road to #SWCC 2019 - The Packening

I've been taking the final steps for getting ready for Celebration, doting all the i's and crossing all the t's.

Packing the Armor (FINALLY!)


My garrison mate TK-70701 came in, in a pinch, to keep me from wasting more money on bins that would still be too over-sized for the airline or having to relay on rendezvous-ing with a Kessel Run. It's the same suitcase he used to transport his armor abroad and back with little armor damage. Hopefully my luck as as good as his! 

The trick was getting everything in there without bending or breaking anything. It took me a few attempts to get everything in there. but finally I had a revelation. 

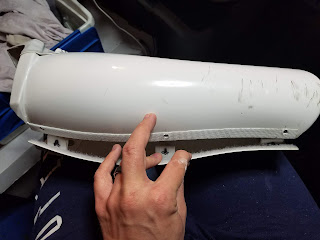
The trick is the thigh pieces, being the biggest rigid parts, and mine are shimmed to be bigger, making them larger than some. So the trick is to pack as much armor in them as possible, and fit everything else around them, like the ab/ kidney plates which are permanently attached on one side due to the left side strapping. Usually I don't take the shoulder bells off my arm pieces when I use the Huskys, but when I did, I was able to pack everything together tightly.

Here's how I played #TKTetris, keeping in mind that the case is already foam-lined:
  • Put the boots on the bottom of the suitcase (they're heavy and should be on the top of the case when it's vertical).
  • Stuff the hand guards into the forearms; forearms into the biceps; biceps into the shins; shins into the thighs (with some foam padding between the shins and inside of thighs for extra shock absorption and rigidity).
  • Lay the ab/ kidney/ butt assembly into the luggage, kidney and butt plate down, but upside down (cod towards the top of the suitcase). This way the flat parts of those pieces face down when the case is vertical, reducing the chance of the cod piece cracking.
  • Lay down some foam inside the kidney and butt plates.
  • Lay the stuffed thighs into the inside of the assembly (alternating top to bottom for a better fit for both thighs) after laying down some foam.
  • Undersuit and soft parts are stuffed in the bottom between the boots and armor for extra cushioning.
  • Shoulder bells go to top of suitcase above thighs. (keep them from getting crushed when case is vertical).

  • Lay more foam, and close the ab piece on top of the thighs.
  • Lay more foam, rest the chest pieces & shoulder straps on top of and over the cod piece; rest the back piece below and underneath that.

  • Lay more foam on top.
  • Thermal Detonator and repainted Disney blaster get wrapped separately and gently squeezed into the hinge side of the suitcase (blaster is marked for easy TSA inspection as need be).
  • Repair kit with new tube of CA glue gel, spare ABS scrap, Chicago Screws, safety pins, and other stuff gets slipped inside the armor near the shoulder bells.
  • Place note inside suitcase for TSA (heavily borrowed from one written by TK-70701 when he traveled with his armor).
  • Orange pauldron with SCG logo is wrapped in a clear plastic bag and goes on very top (to act as extra padding too).
  • Close it up, put the TSA lock on it. Done!
This seems like the best setup for the job. The armor supports each other with quite a bit of foam padding to help with absorbing shock. I'll just have to pray that the gorilla baggage handlers aren't too rough with the case.

TK-70701's suitcase ended up being... very on-the-nose for this job. Not that I'm complaining. Quite the contrary.

When in Rome...

The Other Stuff


The TKTalkie and other electronics are traveling in my clothing suitcase. I could have probably put that stuff inside the armor somewhere (maybe), but I'd rather have TSA open the other bag than have to unpack my armor to get to anything, and then have them re-pack it incorrectly and risk damaging anything. The electronics are in a marked baggie ready for TSA to easily inspect them as need be.

Yes, I had to pack other clothes too I suppose, including my black staff officer outfit, t-shirts, pants, and my club shirt. Must remember an umbrella as well, thanks to Winter Storm Wesley :/
REPRESENT.
... I'll have to fix that one patch later. Tilted.

It's getting really close. Last night I made sure I had everything for my armor. Good thing too; I almost forgot to pack the web belt for the thigh garters. Tonight I make sure my clothing case is packed and nothing important is missing (especially the CON PASSES), as well as packing my carry-on that will travel in the plane wit my bucket and I.

I haven't been so nervous in... a while. I think I'll be better once I get to Illinois. I hope so. We'll see how the armor holds up in air travel. Until next time...

Thursday, April 4, 2019

The Road to #SWCC 2019 - It's Bin Fun (Not Really)

Bin There, Done (with) That

So in my last blog post, I was planning to use a new Husky 25 gallon bin to transport my armor:

You know, the one I painted and can't return to Home Depot?

The problem is, even the smaller bin is over-sized by air carrier standards.

Air carriers measure luggage by linear dimensions; that it, the L + W + H of an item. Over-sized baggage is anything over 62" linear. Even the small Husky comes in at about 72" - that's 10" over the limit, so not even wiggle room worthy.

A confirmation on another Celebration group I follow from one of our airline veterans confirmed this.

Over-sized Baggage on Airlines


So the different airlines have their own policies about over-sized baggage fees, ranging in the realm of about $75 to $200 per piece, one way. United and American (my airline for this trip, thanks to frequent flier miles) are the worst, at $200 per item.

Worse is that fees can stack. Say your over-sized item was over 50 pounds. It would be considered over-sized (+$200) AND overweight (+$200). Add on the normal checked bag fee of $25, $35, or $50, and it can cost anywhere between $425 - $450 to put your armor bin on a plane, ONE WAY. You can check out American Airline's "wonderful" policies here (in short: do NOT fly to cons with American or United if you can avoid it). This actually happened to someone in my garrison who flew United for Celebration one year (probably Orlando).

Southwest, by comparison, would charge only $75 each way since the 25 gallon Husky is between 62 and 85 inches linear (their policy can be found here). But your airline is going to charge out the nose for over-sized bags, what are you other options?

Hard Suitcases


The least worrisome option is a hard suitcase that will protect your armor (minus the bucket, which you'll need to transport as carry-on luggage) without qualifying as over-sized. Of course, hard suitcases can be even more expensive than an armor bin, but will save you more in the long run.

Thankfully, my garrison mate TK-70701 has experience traveling with armor, and a hard suitcase that I can borrow, which is a godsend considering that I already spent $60 on a Husky I won't even be able to use.

Edit; TK 78383 recommends the Sterelite Foot Locker at Walmart. It measures in at 62.75" according to the online specs, but there might be some wiggle room with your airline. He says he's "done this multiple times" with this particular box.

Admiral's Club or Similar


Sometimes, top-tier airline travelers can travel with over-sized bags at the same rate as a normal checked bag, but this varies from airline to airline.

Ship by Freight Carrier


You can always use UPS or FedEx to ship your bin. Obviously ground freight is most economical, but can still be around $120 each way by my own estimates. And if you need it overnight... you may as well pay the airline to do it, because it will be just as expensive, if not more so.

The Kessel Run


People in some garrisons will sometimes own or rent a large truck or trailer and drive to Celebration with several bins, usually for a fee of $150 - $200 round trip (it's really up to them what they charge - this is based on my own experience). They meet you at your hotel or at Celebration with your bin, you do the con, and then you pack it up and they drive back home with it. It's a lot cheaper than many airlines' over-sized baggage fees or ground shipping, especially if you want to get your full-sized bin to the convention and don't want to buy a hard suitcase or worry about baggage handlers.

This can be handy if the person doing this is someone you trust, their schedule coincides with yours, and you're staying near the convention. I'm not staying near the convention and my schedule involves visiting my family back home as well, so I will probably not opt to do this for logistical purposes, especially if there's a hard suitcase available from my garrison mate.

Anyhow... back to other non-transportation-related news...

~~~~~*****~~~~~

Polishing armor

Armor now repaired (or at least good enough for a con), it was now time to shine it.

Sometimes you need to use a Magic Eraser, especially when boots (or bots, whatever) scuff against the shins. This doesn't really worry me, as the micro-abrasions can usually be buffed out with Novus 2 or car wax (see below).

For some of the scratched areas, I used a buffer wheel (that you can get with a headlight restoration kit) on my drill driver and Novus 3 to help relieve the scratches. I think at this rate I'll have to start making a Heavy Weapons Trooper backpack so I can just start weathering the armor and not have to worry about polishing it so much :D But until then, the buffing wheel and Novus work pretty well. Just ensure you support the piece properly with one hand while you work with the buffing (bugging?) wheel with the other hand.

Besides the normal Novus 1-2-3 for removing scratches, Turtle Wax or automotive was works really well to get white armor shiny. I use the Wax  & Dry stuff because it's easy to apply and shine.

The Side Gig

Along with the armor, I have another costume I have to wear: my recently approved black staff officer outfit.

This costume almost fell into my lap. A garrison mate who's about the same height and weight as me sold this for cheap, and I picked it up. Had to make a new hat (which I sewed myself thanks to the tutelage of another garrison mate and patterns on the Internet), but even the boots fit me to a T. It was an easy approval since it had already been approved on another person, so I'll have this costume for days I want to be more casual at the con, and if plans for the armor completely fall through for whatever reason.

So in the meantime, I have to pick up the hard suitcase from my SCG mate, get the armor packed, go through my swag to see what coins and patches I want to bring for trade, and the various other final details of the trip. But I'll have more in my next blog post. Until next time...

Wednesday, April 3, 2019

The Road to #SWCC 2019 - What Have a Got Myself Into?

My trip into making stormtrooper armor and ultimately joining the 501st Legion began at Celebration 2015 in Anaheim, California. It was after Celebration where my friend and coworker told me about the Anovos deal which got me and many others in on the ground level for a song.


My first encounter with the 501st Legion.
My son's too for that matter.

It was fitting, then, that Celebration in 2019 came to my home state of Illinois. I could go home, visit the family, and go back to where it all began, so to speak. It ended up also becoming a late graduation gift for my nephew, who will be coming with me.

It also (also) ended up being a logistical obstacle course and a huge money sink. There were expenses for the SWCC passes, tickets for the multi-club Celebration Bash (at the Museum of Science and Industry, a favorite of mine), parking during the con (pre-paid parking is cheaper), airport parking, rental car, luggage fees, food expenses during the con, etc. etc.

Thankfully, I can stay with family instead of paying almost a grand in USD for a hotel, AND I had enough frequent flyer miles to get there and back, so two major expenses were avoided.

But there's also a ton of preparation, like activating passes, signing up for the various Celebration lotteries for panels and exclusives, printing out receipts for pre-paid items, and especially packing.

So I had to start planning how I was going to approach this from a frugal and practical angle.

To start, I wasn't going to take my huge 50 gallon tote to Chicago, mostly because I'd have to have someone to transport it for me, or pay up to $100 each way in over-sized baggage fees. Plus, I'd ave to rent a larger car for perhaps twice as much per day compared to a small sedan. Instead, I purchase a 25 gallon Husky tote that should qualify for regular checked bag fees instead, and will fit all my TK armor minus the bucket, which will travel with me in the cabin. it was $60 for the tote, but it will save me much more than that, so it was a net gain. I put some stencils and stickers on it too.

Arts and crafts paying off

Edit 4 April 2019: Any sized Husky bin is considered oversized luggage by any air carrier, so I'll be making alternate plans to use a garrison mate's hard suitcase for transporting my armor. More on that in future blog updates.

Before I start polishing and packing the armor in foam wrap, though, I did some work on a fan film shoot in Big Bear (I was hoping to include it in this blog post, but it won't be released until closer to Celebration). The conditions were cold, snowy, and icy, and traction was a premium, especially in TK boots with no tread. Near the end of the day, the icy snow turned to slush and I went down, putting a small crack near the edge return of my kidney plate. Earlier, I crammed my right knee ammo packs into a rock outcropping and cracked them big time. And throughout, I kept having issues with my chest plate working with my new PA chest bag (in the previous blog post) and my shins popping open, due in part to the thicker undersuit I used for the shoot due to the temperature.

Needless to say, it was time to go over the armor and make some repairs and adjustments before the big meeting at Celebration.

I covered the chest piece in my last blog post, and also how I adjusted the comm bag for a higher fit underneath. A test fit of my torso armor with the chest bag underneath confirmed it was finally in a good place. The Velcro straps that kept the chest piece on the ab plate was getting old, so I flipped the straps in the meantime since the other side wasn't nearly as worn. It should suffice until after Celebration where I can concentrate on making snap plates, saving a little money until then.

The knee boxes were more difficult, and required many days of work with ABS paste, especially after the most affected box partially melted when I added ABS paste reinforcement underneath. So I had to add even more paste to the top, shape, sand, fill, etc. until the shape was right, or at least close enough.

Slightly misshapen and mis-colored now, sadly.
Maybe I'll do more work on it after Celebration.

The shins were easier, but also scarier since I had never done the bra hook thing before. I got some advice from SCG's own master armorer TK-70701 and, of course, UKSWrath's guides here and here. First I got some scrap elastic that I used for the shoulders, cut it in half lengthwise, and made 6 strips, three for each shin. I used  the sewing machine to create the loop on one end, and then sewed on the bra hooks by hand (the most tedious part).

I made three equidistant holes between the lower, mid and upper shin and installed the bra hooks just short of the end of the armor plate, so they' need to be stretched just so so keep tension on the other half of the shin closure.


The other big trick is to ensure that the hooks are as parallel as possible to the holes to keep the two halves of the closure lined up; otherwise, it might go canted and not line up at top and bottom.


I did one shin at a time, to ensure the placement was sound before starting the other shin, and also due to a lack of magnets to do both shins at once. Test fit on the right shin was a success, so I did the left shin the next night.

I also decided to still keep the Velcro, for now, since it's a giant PITA to remove (a lot of scraping adhesive and orange oil cleaner, and that's a lot of work with so much left to do before Celebration). But this way, if the Velcro pops, the bra hooks will ensure the shins stay closed enough that I don't have to fiddle with them constantly. The shins are a bit tight and I honestly should have trimmed them 1/2" less during initial construction, but the new bra hooks are the next best thing to new shins, for sure.

There's still a lot to be done. After the closures are glues, I still have to clean an polish the armor before backing, get my other costume packed, and get everything else packed too. But more on that in the next blog post...